Parameterizing a component has many advantages over hardcoding the value. When the package has to iterate through different loops, it is always a necessity to dynamically provide the properties in the component, whether it be for filtering the Source data or for providing a file path (stating few from many others). It may seem like a few extra steps, but this could make your SSIS project extremely flexible, portable, and allows you to manage dynamic values that change routinely, quickly. In this blog, we will see how parametrization can be done easily in KingswaySoft components. We will be going through some examples of some common scenarios, in which we shall first get the syntax for the property expression, and then utilize that to create a custom expression with the variable in it.
To work with parameterization, first, we would need to set an SSIS environment variable. Variables provide the mechanisms by which you can provide values dynamically during runtime. This could be from a different data flow task or any other process. Creating a variable is a simple step as shown below.
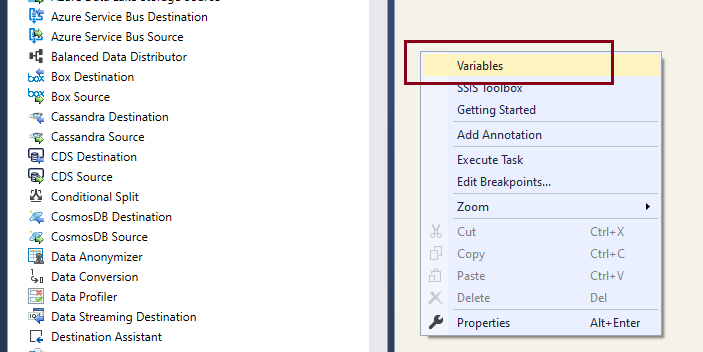
You could right-click on the workspace, and select Variable, that would open up the below window. In that, you can create a variable and assign a datatype as required. It is essential that you provide a dummy value to the variable, as when you parameterize a property and assign the variable, this dummy value would be assigned to that property. If there is no value, the property that cannot have null or empty values will throw an error at the design level. This dummy value would be replaced at runtime by the actual value that you are assigning to the variable.

Example #1
Now, as an example, we would be working with our REST SurveyMonkey component. Let’s assume that you need to get the details of each of the survey responses returned read separately. As shown below, the Source Object “SurveyResponse” and endpoint “Get a Survey Response” requires two mandatory parameters - Response_id and survey_id.
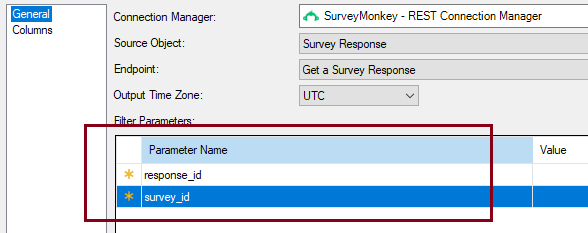
Now, since these are mandatory and need to have a value for the component to save correctly, you will need to ensure that while parameterizing, the component, as well as the variable, needs to have dummy values in it (as mentioned above). If not, it could throw errors like the one shown below at the design level.

Once you have provided the dummy values, you could close the component by clicking OK so that it will be saved, and then you can get the syntax for the expression. To get this, right-click on the workspace and open Properties. In the Properties window panel, find the syntax expression in the Misc section. Copy the expression and keep it ready.

{
  "response_id": "123",
  "survey_id": "456"
}
Now, open the component once again, and then click on the fx icon at the bottom, and then, from the Property Expression Editor that opens, choose the property FilterParameter and click on the ellipsis button to open the Expression Builder.
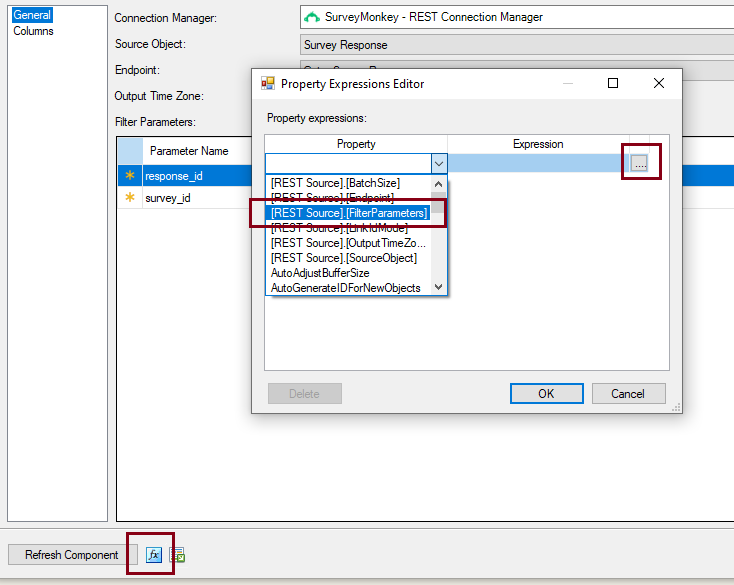
You can provide the below expression in the expression builder with proper escape characters, and by concatenating the variables to the string. Also, make sure to click on Evaluate Expression to check the expression.
"{
  \"response_id\": \""+@[User::Var_res_id]+" \",
  \"survey_id\": \""+@[User::Var_sur_id] +"\"
}"
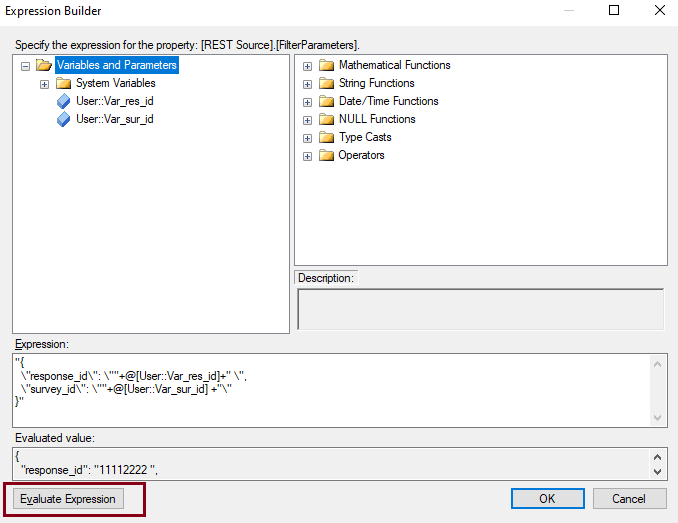
Once the expression is evaluated, click on OK and then you will see that the dummy values in the variables have replaced the initial values you have entered. As mentioned above, these values would be replaced at runtime by the values that the variables keep receiving.
Now, a common question would be how to get the list of values of survey_id and response_id. For this, you will have to use another Rest SurveyMonkey Source component in a previous data flow task. And then using an endpoint that has these values (probably an endpoint like “Get Survey Responses” which returns all the details of all surveys), you can get the list of survey_id and response_id, which you can store into a recordset destination component and thereby to an object variable. Then, using a Foreach loop container, you can pull the values of these two fields one by one to two variables, which will then be used in the above parameterization.
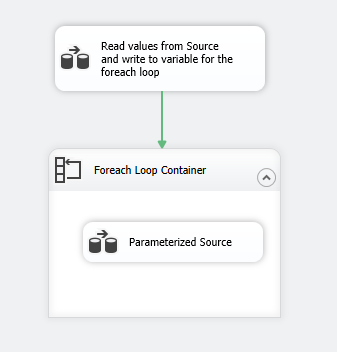
Similarly, on another note, in case of endpoints, where more properties need to be parameterized, you could follow the same strategy as finding the syntax and creating the expression. Please see an example shown below for a different endpoint.
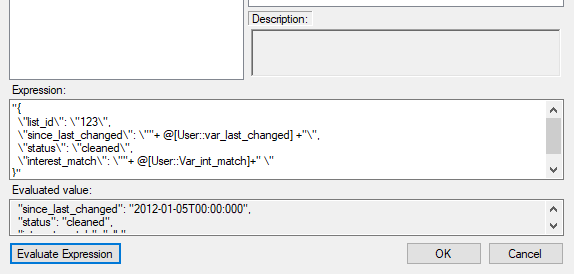
"{
  \"list_id\": \"123\",
  \"since_last_changed\": \""+ @[User::var_last_changed] +"\",
  \"status\": \"cleaned\",
  \"interest_match\": \""+ @[User::Var_int_match]+" \"
}"
Here, we have provided variables for only two parameters and the rest will be static.
Example #2
A second example of where parameterization comes handy is when you need to use it on of our File Pack components, like, for example, Premium File Transfer Task. There could be cases in which you would need to check your SFTP path at every specific interval to see if the names with a particular datetime tag or name have come up and if so, then pull them to a Destination path. This process, too can be easily handled by using the above steps. All you need is a list of the names from a database or a file assigned to the variable one by one using Foreach loop as mentioned in the previous example. If it is a date, then you can quickly get it from the date functions and format it accordingly using a Derived Column and then assign it to a variable.
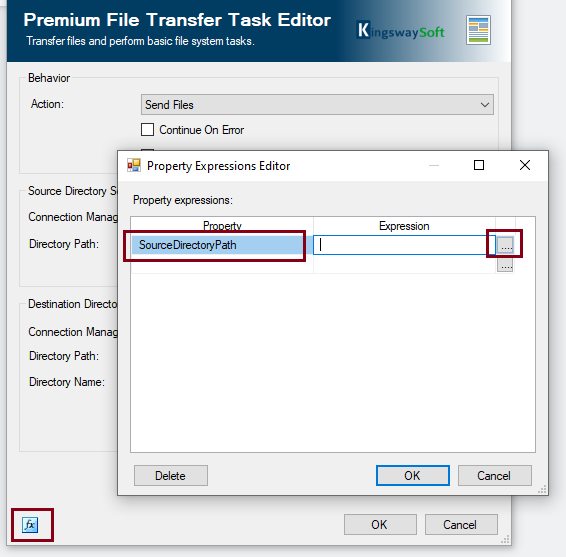
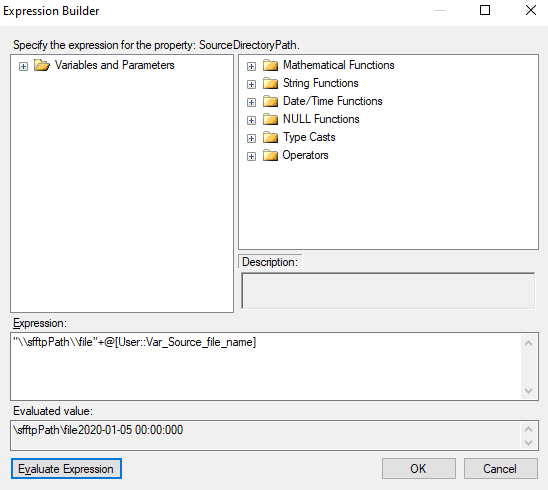
In the expression builder, you can concatenate a variable to the directory path as shown below.
"\\sfftpPath\\file"+@[User::Var_Source_file_name]
Conclusion
By following the above steps, you can easily handle dynamic changes in the package iteration. A few things to note would be that the variable that is being used should be usually of string datatype, as that would ensure concatenation with the rest of the expression. And also, the values that the variable would receive should be handled in the previous steps, i.e, prior to the current data flow task, to make sure that the package doesn’t break.
Please note that this method of parameterization can be applied to all our components. You will need to work with the specific properties and the expression editor in order to create the expression and merge variables into it to dynamically assign values.

