Note: Microsoft has rebranded Team Foundation Server to Azure DevOps. While our blog post mentions Team Foundation Server, information presented works with Azure DevOps as well.
There may be many reasons that you might want to extract attachments from Salesforce or Team Foundation Server (TFS), such as moving attachments to different cloud storage or syncing the attachments between different systems. In this blog post, we detail how to extract attachments from both systems as well as write attachments to them.
We also have a sample SSIS package available for downloaded that can sync Salesforce Case Files/Attachments with their related WorkItems in Microsoft Team Foundation Server.
Working with Salesforce Attachments Objects
First, it is essential to note that there are different ways in which a Salesforce instance can be configured to manage uploaded files and attachments. Based on the chosen configuration, the related Salesforce objects that we need to work with in our integration package will be different.
For instance, by enabling the following highlighted option found under Setup | Platform Tools Section | Feature Settings | Salesforce Files | General Settings, Salesforce Files will be enabled. This way, attachments will be considered as Files that users can share and manage beyond the specific record the attachment was uploaded to.

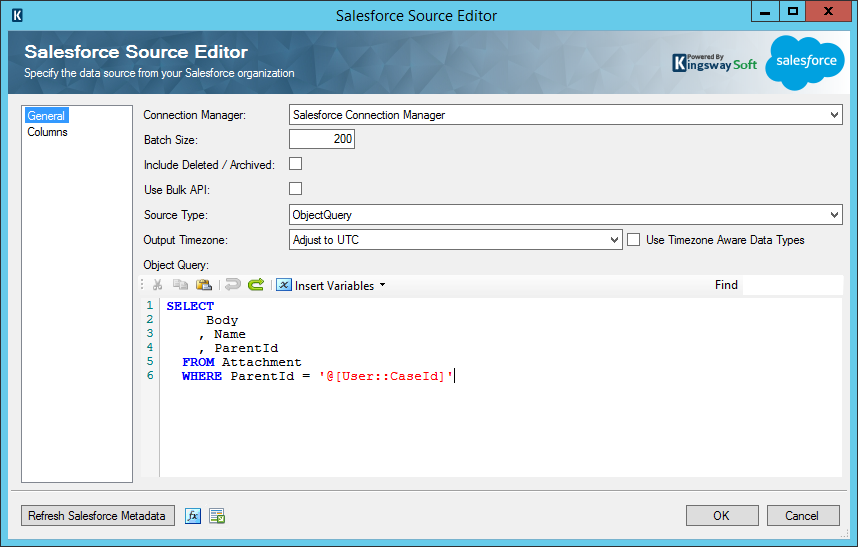
By contrast, without this option enabled, Salesforce will use the attachment object to store the uploaded file, which are only available from the record it was uploaded to. Working with the attachment object is very straightforward where the ParentID field is the Salesforce ID of the record which the attachment is linked to, the Name field contains the name of the uploaded file, while the Body field contains the binary data of the file. For example, you can use our Salesforce Source Component to retrieve attachments related to a particular record by filtering on the ParentID field, as shown below:
On the other hand, when working with Salesforce Files, when a file is uploaded, an entry is created in the ContentDocument object. This entry links to the ContentVersion object because a document can have one or more versions. Also, a document can have several ContentDocumentLink records connecting it to other records that it is shared to. The actual file content is held in the ContentVersion object.
Therefore, If you need to acquire files that are attached to a specific record in Salesforce, you'd first need to query against the ContentDocumentLink object and filter by the LinkedEntityId field, which is the ID of the record your files are attached to. Once done, you can use the ContentDocumentId field from the ContentDocumentLink object to query against the ContentVersion object to get the binary data of the file you are looking for. However, we can utilize SOQL subqueries to get the desired file using a single SOQL statement. In the following example, we are retrieving the last version of the file, which shares a record in the Case entity with a particular subject.
SELECT
LinkedEntityId
    , ContentDocument.Title
    , ContentDocument.FileExtension
    , ContentDocument.LatestPublishedVersion.VersionData,
    ContentDocument.CreatedBy.Name
  FROM ContentDocumentLink
  WHERE LinkedEntityId in (SELECT Id from case where subject ='Case Subject')
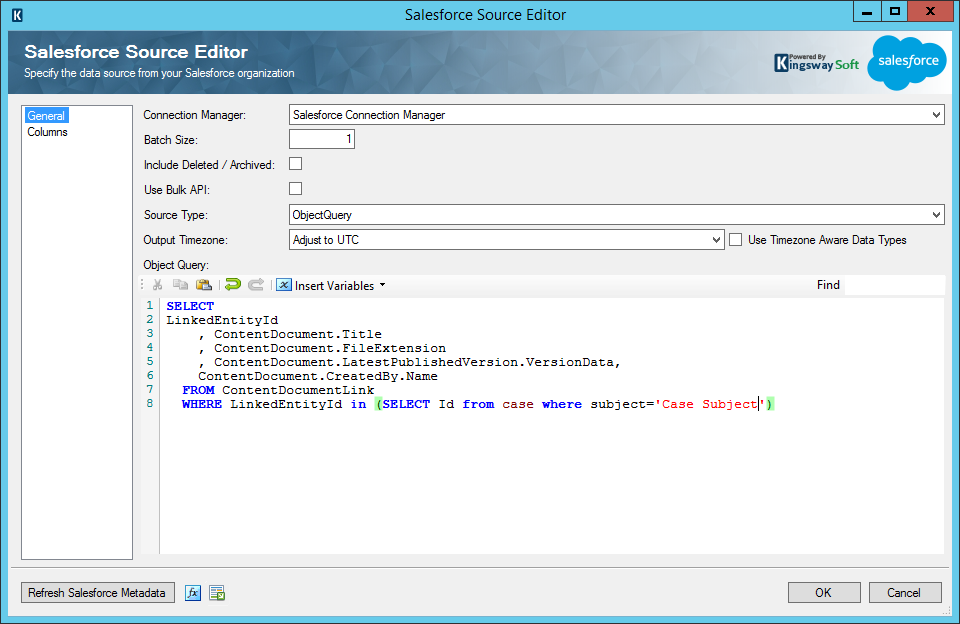
When writing attachments to Salesforce, follow the same approach but use our Salesforce Destination Component instead. First, we write our files to the ContentVersion object, which, in return, automatically creates an entry in the ContentDocument object. Then create a record in the ContentDocumentLink object to link the newly created ContentDocumentId with the Salesforce record Id (LinkedEntityID) as this shares the uploaded file to a particular record.
Working with Team Foundation Server Attachments
To retrieve the attachments using our Team Foundation Source Component, simply enable the Attachments additional output under the Workitem Detail Types option as shown below:
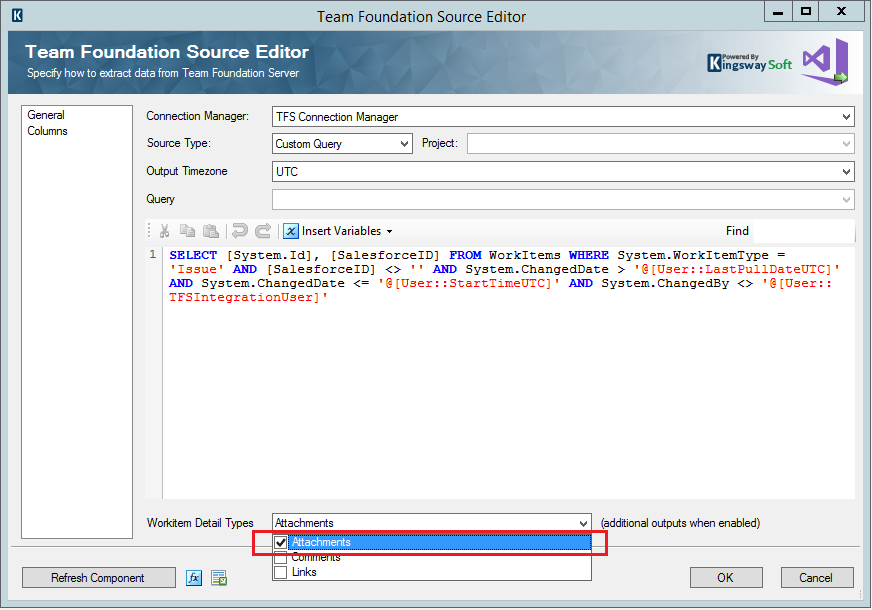
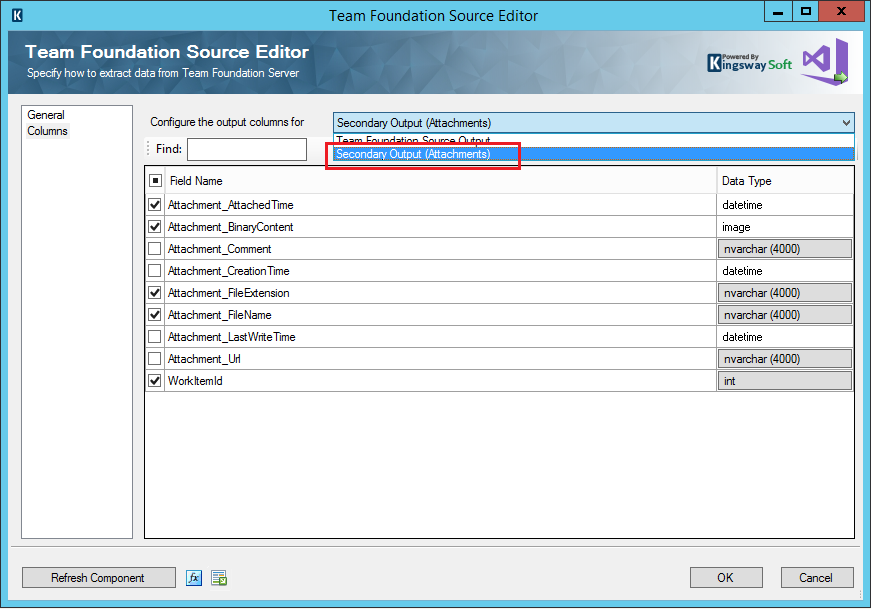
This way, along with the primary output of the component, which contains the Workitem data, there is a secondary output that contains all the related attachments for the retrieved Workitems.
Then, to write attachments to Team Foundation Server, we can use our Team Foundation Server Destination component and select the WorkItemAttachment Destination Entity to pass the attachment along with the WorkitemID it will be uploaded to.
Sample Integration Package
We have prepared a bi-directional integration package that syncs newly created Cases along with their related attachments from Salesforce to TFS as WorkItems of type 'Issue'. The package also updates back changes that have occurred on the TFS WorkItems to their related Salesforce Cases, including any attachments which may have been uploaded. The overall Control flow design of the package is shown in the screenshot below:
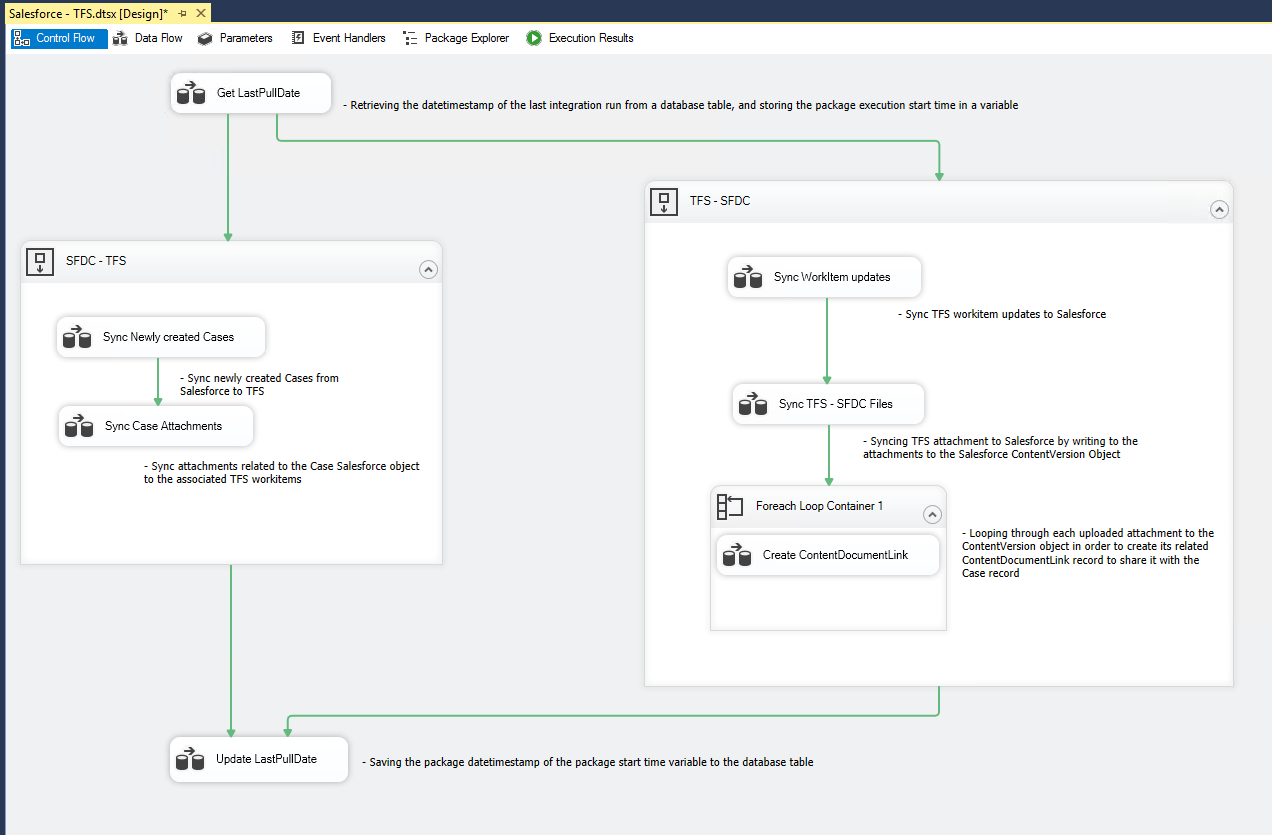
The first step in the package is to retrieve the date timestamp of the last integration run from a database table into an SSIS variable as well as save the package start time into a second SSIS variable. These variables are required to only retrieve the delta changes from both systems since the last integration run. We write to both variables by using the WriteValueToVariable function available in our Premium Derived Column component.

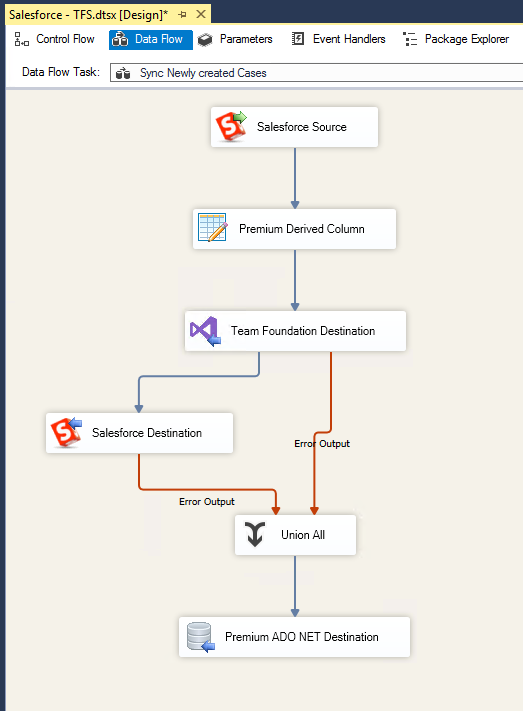
The next step would be to sync the newly created Cases from Salesforce to TFS. To do so, In the first dataflow task in the "SFDC – TFS" container, we use a SOQL query to filter the newly created Cases based on the SystemModstamp field, and we also exclude any changes which were done by our integration user so that we avoid running into an infinite loop of integrating the same record back and forth between the two systems.
We then use the Upsert action in our Team Foundation Destination Component to create or update Workitems on the server. It is essential to update back the Salesforce Case record with the newly generate WorkItemId so that a given Case can always be associated with a particular WorkItem. Finally, we log any errors which might happen during the writing process to a database table using our Premium ADO .NET Destination Component.
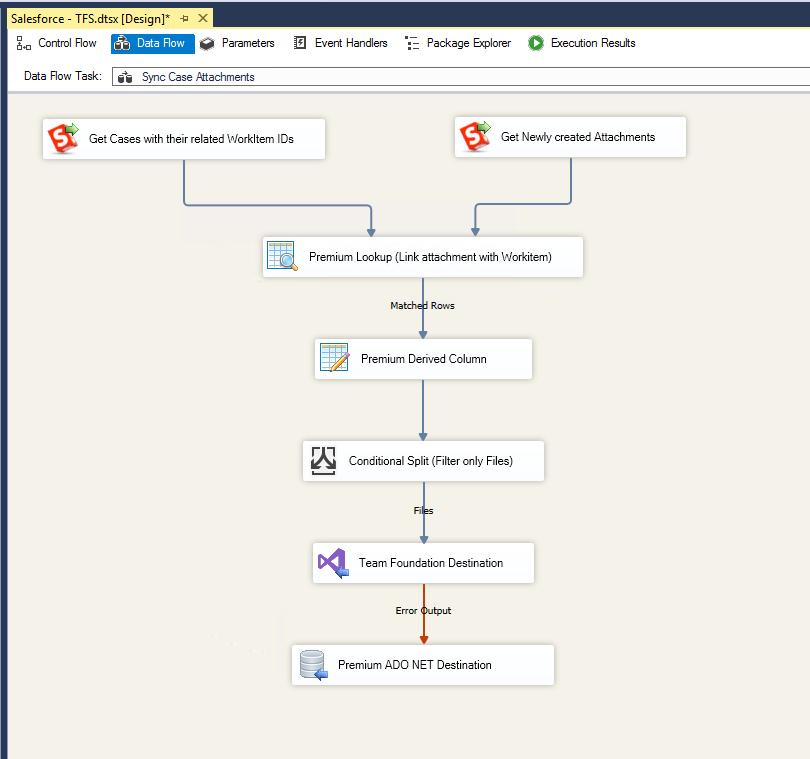
Once the newly created Salesforce Cases have been integrated, we can now move on to integrate any Case related files or attachments to TFS. First, we query the ContentDocumentLink Salesforce object to retrieve any newly created attachments which are related to cases and were not created by the integration users. Therefore, the query would be as follows:
SELECT
LinkedEntityId
    , ContentDocument.Title
    , ContentDocument.FileExtension
    , ContentDocument.LatestPublishedVersion.VersionData,
    ContentDocument.CreatedBy.Name
  FROM ContentDocumentLink
  WHERE LinkedEntityId in (SELECT Id from case ) and SystemModstamp > @[User::LastPullDate]
  AND SystemModstamp <= @[User::StartTime] AND ContentDocument.CreatedById != '@[User::SFIntegrationUser]'
However, by just querying the ContentDocumentLink object, we cannot determine the WorkitemId, which a particular attachment should be uploaded to. Therefore, we use a second Salesforce Source Component to query the Id of Cases along with their related WorkitemIds. Then we use our Premium Lookup Component to link the retrieved attachments with the data from the Case object to have the WorkItemID along with the associated attachment data in the same record.
Also, the ContentDocumentLink object may contain other records besides Files such as comments which we need to exclude from this Dataflow by using a Conditional Split Component. Finally, we pass the attachment along with the WorkitemID to the WorkItemAttachment Destination Entity in the TFS Destination component.
Please note that it is possible to integrate Case comments as well in the same Dataflow task by using the second output of the Conditional Split component to another TFS Destination component but while working with the WorkItemComment Destination Entity instead.
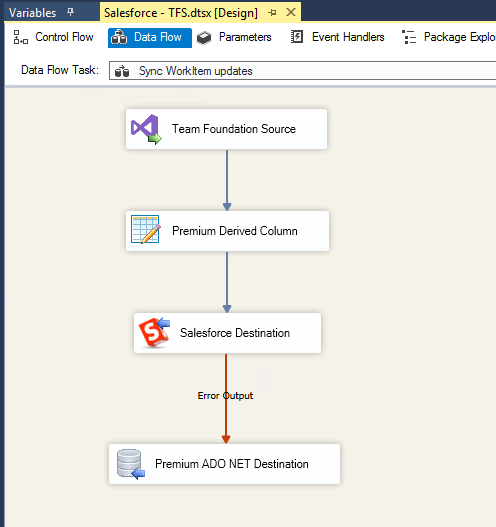
While In the "TFS – SFDC" container, we sync any updates that have happened to WorkItems in TFS to Cases in Salesforce. To do so, we query the WorkItems object, and filter on the System.ChangedDate field to only retrieve the recently changed WorkItems. We also exclude any changes which were done by an integration user and any WorkItems which do not have a Salesforce ID. This way, we ensure that we are only integrating back WorkItems, which originated from Salesforce. Therefore, the user query would be as follows:
Select System.Id, System.Title, System.Description, SalesforceID, System.State
From WorkItems
Where System.WorkItemType = 'Issue'  And [SalesForceID] <> ''  And System.ChangedDate > '@[User::LastPullDateUTC]' And System.ChangedDate <= '@[User::StartTimeUTC]' And System.ChangedBy <> '@[User::TFSIntegrationUser]'
Then we use the Update action in our Salesforce Destination component to update the related cases with the new information from TFS.
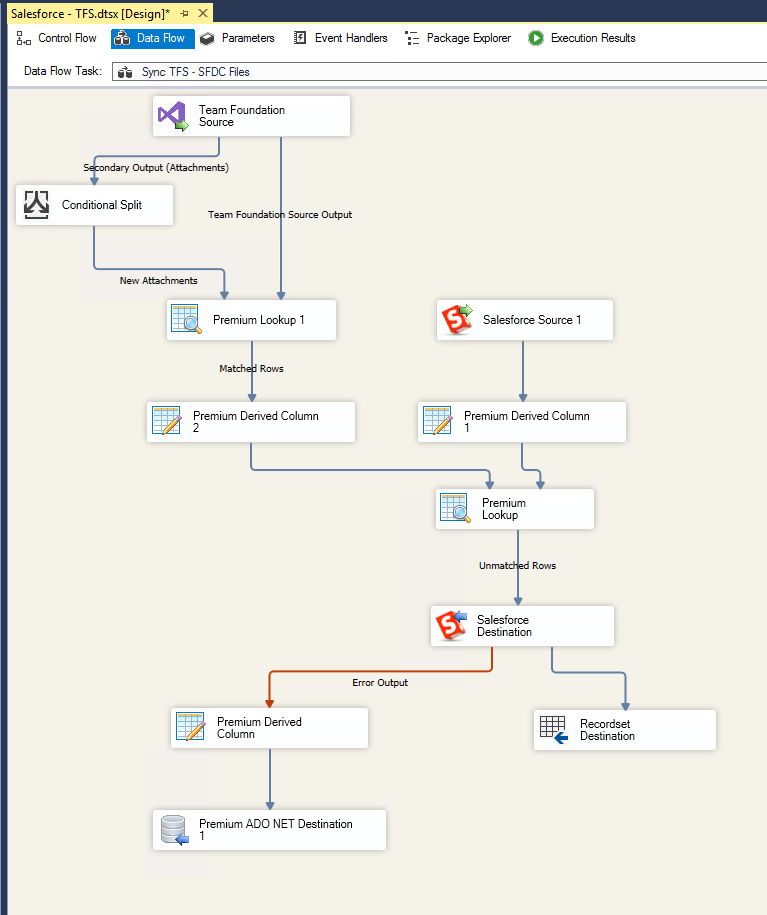
Once the recently changed WorkItems information has been integrated into Salesforce, we can now move on to integrate their attachments to the related Salesforce Case records. First, we would use our Team Foundation Source Component to query the recently updated WorkItems. Then we enable the Attachments additional output under the Workitem Detail Types option.
This way, the component retrieves all the associated attachments for each WorkItem being retrieved. However, we would need to use a Conditional Split component to only process the recently attached files for each WorkItem by working with the Attachment_AttachedTime field. Then to have each attachment record along with its related Case SalesforceID in the same record, we would use our Premium Lookup component to join the primary and the secondary outputs of the component.
Now, what is left is to exclude any attachments which were created by the Integration user. We can do accomplish this by comparing the Checksum of the existing attachments in Salesforce with the Checksum of the retrieved attachments from TFS. This way, we can ignore any attachments that have the same Name and Checksum so that we can ensure that we are only integrating non-existing attachments to Salesforce.
To do so, we rely on our Premium Derived Column component to calculate the Checksum of the retrieved TFS attachments, and then we use a Salesforce Source component to get the Checksum of the existing Salesforce attachments. Once we have both datasets, we can use a Premium Lookup component to compare them with each other, and then we would only use the Unmatched output to integrate it with Salesforce by writing to the ContentVersion object using a Salesforce Destination Component.
The final step would be to use a Recordset Destination component to save the Case IDs along with the newly created ContentVersionIDs to an SSIS object variable so that we can loop through them and share each uploaded document with its respective Case record in the following Dataflow task.
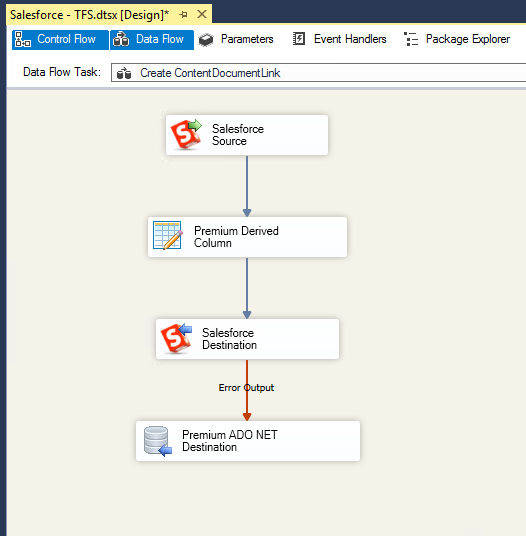
Once the attachments have been uploaded to Salesforce successfully, we can create the required records in the ContentDocumentLink object to link the newly created ContentDocumentId with the Salesforce Case Id (LinkedEntityID field) which shares the uploaded files to their appropriate Case records. To do so, we use a Foreach Loop container to loop through the object variable we have saved the dataset to in the previous Dataflow task, then we query the ContentVersion object to get the newly created ContentDocumentId which is used to link the attachment to its respective Salesforce Case ID (LinkedEntityID).
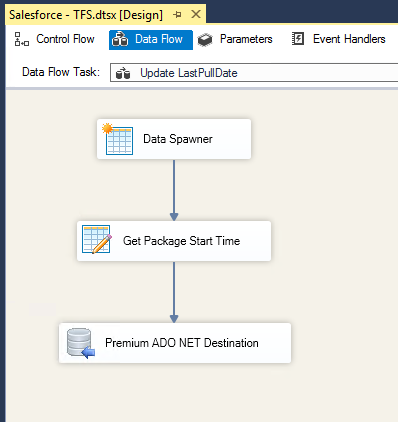
Finally, after the two sequence containers have completed successfully, we save the timestamp of the start time of the package execution to our database table so that in the next integration run, we only retrieve data that has been changed since that timestamp. To do so, we use our Data Spawner component to generate a dummy record, and then we use our Premium Derived Column component to create a new column with the value of the StartTime variable. Once this has been done, we write this value to the database table using our Premium ADO .NET Destination Component.
About the Sample Integration Package
- We have created all the required Package Parameters to change the connection information to your environment without the need to update each Connection Manager manually.
- Along with the connection related package parameters, it is vital to set the SFIntegrationUserID parameter to the Salesforce ID of the integration account used in the Connection Manager and to set the TFSIntegrationUserName parameter to the full username of the TFS user account as these are used to prevent re-integrating data which was written by the integration package.
- We assume that there is at least one field created in the Salesforce instance to hold the WorkItemId of TFS in the Case record. There is also a field in the TFS instance that holds the Salesforce ID in the WorkItem.
- You can adjust the mapping of the Case object integration to add more columns to be synced depending on your integration requirements.
To use the package, you first need to:
- Download the sample package from the following link: Download
- The sample package was prepared in SSIS 2014 format; however, it supports SSIS versions from 2012 and higher. You would just need to change the TargetServerVersion setting in your SSIS project to your particular SQL Server version.
- We recommend using SSDT-BI instead when working with SQL Server 2012.
- Our Team Foundation Server toolkit does not support SSIS 2008 R2 or earlier due to the requirement of specific .NET Framework, but our Salesforce toolkit and our SSIS Productivity Pack both support SSIS 2008 R2.
- Please note that you need to have the following software solutions installed when opening the package.
- When first opening the package, you might encounter the following message "Failed to decrypt protected XML node "DTS:Password". However, this message can be ignored, and you can proceed to open the package as it is related to the sensitive properties of the connection manager, such as the password which you would re-enter using your own credentials to connect to your environment.

