Message queues are pivotal when it comes to communicating within a system or multiple systems, letting different parts of a system communicate and process operations asynchronously. Message queues also provide a lightweight buffer that temporarily stores messages and endpoints, which allows client components to connect to the queue and send and receive messages. KingswaySoft offers a number of SSIS data flow components that work with various Message Queue services that can be used as part of your integration workflow. Today, we will be looking into a specific constraint that such message queues could cause when using higher volumes of Messages, and how this can easily be handled within SSIS. An example would be those Azure Service Bus components offered in our SSIS Productivity Pack, which can be used to read and process data from Azure Service Bus queues. It is worth mentioning that our software capabilities, with no exceptions, are constrained by the underlying API behaviors. For instance, when you work with higher volumes of Azure Service Bus messages in your data process, you may run into this error below:
Microsoft.Azure.ServiceBus: The lock supplied is invalid. Either the lock expired, or the Message has already been removed from the queue.
This error is a resiliency-related error, which is caused by the Default Message Lock Duration from the Azure Service Bus API. The Message Lock Duration is the time during which the message is exclusively locked. When you interact with any messages from Azure Service Bus, those messages will be locked and unable to be accessed by other receivers until the lock is released. However, if the consumer doesn’t complete processing within the lock duration configured, the lock will expire. The default value for the lock duration is 1 minute. If you are working with a low Buffer Size and a large number of records, this may cause an issue, as it will go over the Message Lock Duration. In this blog post, we will discuss how to read and process Messages from Azure Service Bus, and then how to work around the API limitations. It is worth mentioning that the error is specific to Azure Service Bus, but it can happen to any other message queuing service. Such problems can severely impact the resiliency of your data processing flow if not carefully designed.
Today, we will show you a design pattern that you can leverage to make your data processing more resilient while avoiding such errors. Let's get started by first having a look at our message queue source component.
Working with the Azure Service Bus Source Component
In our design, the first thing that we want to achieve is to read and delete the messages read from the message queue. This would be our case where the above-discussed throttling or lock errors could hit at any point. Having said that, we want to mention that most KingswaySoft message queue source components allow for at least two different modes for receiving and processing messages. For example, when working with the Azure Service Bus source component, the following are the two options offered:
- Peek: The peek option allows you to have a peek at the messages from the queue without acknowledging and accepting the message, so the message will stay in the queue after the message is read.
- Receive Message and Delete: The Receive Message and Delete option allows you to receive messages from the queue and then immediately accept and acknowledge them, which consequentially has them deleted from the queue. Using the Receive and Delete mode, you could possibly set the component to work in a Listener Mode.
In most situations, the Receive Message and Delete Mode will be sufficient for reading and processing any messages while clearing up your queue. However, there is one caveat with this approach: if something goes wrong with any downstream pipeline components while the messages are being processed, it can create a data loss situation. This happens because the message processing fails while the original message has already been removed from the queue due to the mode used in the Source Component.
To overcome the problem, you can change the design to use the Peek receive mode instead, so that you first read the messages and have them processed. After the full data flow is successfully processed, we will use a separate data flow to delete the messages from the queue explicitly. The following is an illustration of the design. You can see we have two data flow tasks. The first one reads using the Peek receive mode in the source component and processes the messages in the data flow accordingly, before having the processed message IDs saved in an SSIS Recordset variable, while the second data flow reads all message IDs from the SSIS variable and sends them to an Azure Service Bus Destination component that performs a Delete action by removing all processed messages from the queue.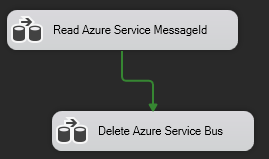
The following illustration shows the first data flow, in which all messages are read and processed before being sent to a Recordset Destination component to have all message IDs saved. There should be another data flow component in the middle of the two components that process the messages.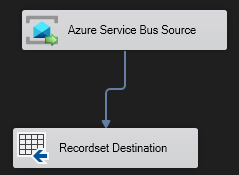
Then, in the second data flow task, you would use the Premium Recordset source component to read all processed messaged IDs. These are then sent to an Azure Service Bus Destination component using the Delete action in order to have all those processed messages removed from the queue and complete the entire integration process.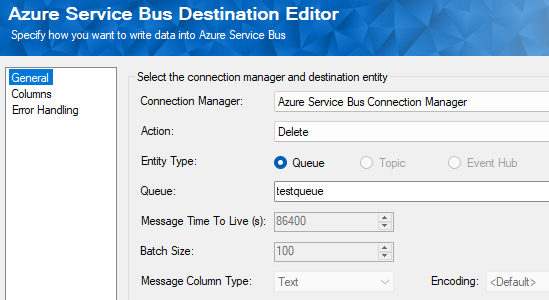
So now, based on the above design, let's look at how this process can be done efficiently while avoiding the above-mentioned volume-related errors.
Option #1: Using an Increased SSIS Buffer Configuration
The first option to get around the message lock-related errors will be to increase the DefaultBufferMaxRows setting in your Data Flow Task’s properties. Please note that you will need to increase the DefaultBufferMaxRows for all Data Flow Tasks that may cause the error. You can access the DefaultBufferMaxRows configuration by right-clicking on the Data Flow Task and selecting Properties.

When the buffer is larger, it will buffer more rows in any components before it sends the first row to the Azure Service Bus Destination Component to delete the Messages. This could possibly decrease the time spent in the delete destination component in order to avoid triggering the lock error. However, this option may not be suitable for all situations and will depend on your setup. To accommodate this change, it might be helpful to provide more memory resources to your system.
Option #2: Using Azure Settings
The second option to fix the error will be to increase the lock duration setting for your Azure Service Bus. To do this, you will go into your Azure portal, and under Azure Services you should find Service Bus: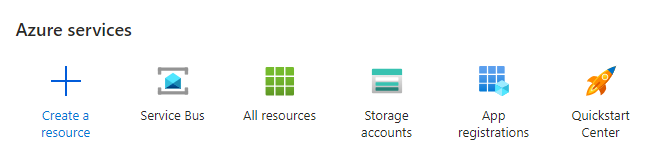
Under Entities select Queues. Then select the Queue that you are working on.
This should direct you to your queue where you will be able to see your queue metrics and details. There should also be a Settings tab with the Message Lock Duration option. Here you can change to Message Lock Duration to a higher value which should allow the component more time to get through more messages before triggering any such lock errors.
The maximum value that can be set for the Message Lock duration is 5 minutes, which should hopefully give you enough time to process the entire ETL process.
Conclusion
By following a combination of the above two approaches, we were able to eliminate the message lock errors, in order to achieve a more resilient message queue process design.
We hope this has helped!