Over the last few years, REST API has grown more and more popular in the sense that it has become a very sophisticated technology used to interact with an application serving the growing application integration needs. REST API offers some tremendous flexibility thanks to its easy-to-build request structure, secure and modern authentication mechanisms, and much-simplified documentation and maintenance. A big special variation of the REST API is GraphQL API, while based on REST API, it offers some significant advantages. Therefore, GraphQL has been gaining momentum in recent years, and organizations and services have been adapting to use it in a wider range. GraphQL, in simple terms, can be defined as a query language, and a runtime engine that fulfills such queries. Having said that, GraphQL's efficiency mainly comes from the fact that it allows clients to specify exactly what data is required, in a single request. This eliminates the problems of over-fetching and under-fetching data. It can also support reading nested and related data in one go, offering a more streamlined approach compared to traditional APIs. In addition, GraphQL is fully metadata-driven which makes the application much more flexible if the application has the needs of user customization. Any additional custom fields can be easily discoverable by making a service call. For the benefits that we have just discussed, we see many benefits of moving Shopify integration from the traditional REST API to the GraphQL API, which is the focus of this blog post. To illustrate the use of GraphQL API, we will be leveraging the following key capabilities available in GraphQL practices.
- Schema: This provides API metadata information including the definition of relationships.
- Queries: Similar to a GET request in a REST API to retrieve data.
- Mutations: Comparable to POST, PUT, or DELETE requests for writing or deleting the data.
- Subscriptions: Enable real-time updates by allowing client systems to receive live and dynamic data.
Today, we will be using the Shopify service as an example to demonstrate how KingswaySoft can be used to easily access and read from Shopify GraphQL API data. There are many similarities between REST and GraphQL, however, Shopify recommends using GraphQL due to the important benefits we have discussed above.
- A single endpoint for all available data
- Performance improvement by reducing payload size
- Safer data handling capability
- All data is included as part of the schema
- First class documentation
In this demo, we will be using our GraphQL Connection Manager and GraphQL Source components which come as a part of KingswaySoft's SSIS Productivity Pack (download link here) since our v23.2 release (we generally recommend you stay with the latest release of our software whenever possible). Note that we also have a GraphQL Destination component that comes with the support of writing data to the target application leveraging GraphQL mutations. We are saving the discussion of the GraphQL destination component for another time if it is something that interests you.
Setting Up GraphQL Connection Manager
In working with the Shopify connection, we will essentially be working with its admin API that is based on GraphQL To do so, open a new KingswaySoft GraphQL connection manager, and enter the Base URL in the format below:
https://{store_name}.myshopify.com/admin/api/{version}/graphql.json
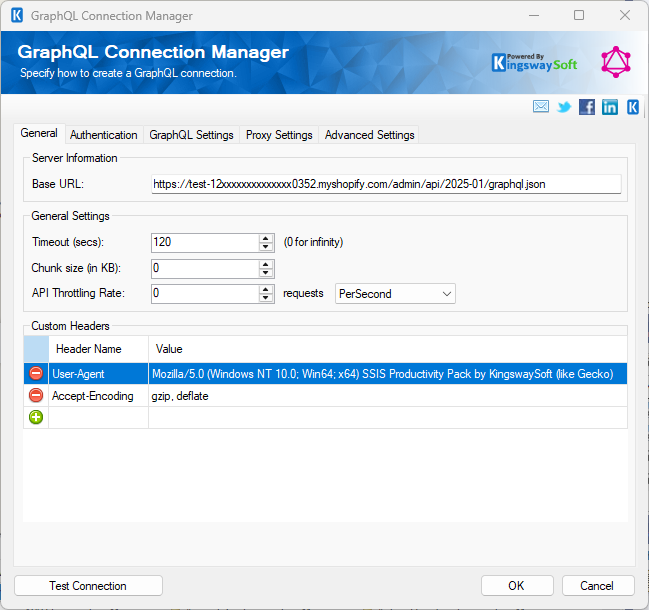
And then we move to the Authentication tab. Shopify supports two types of authentication - API Key and OAuth. In our example, we choose to work with API Key for the sake of simplicity. In doing this, we choose Basic mode in the Authentication Mode dropdown list, since it requires the API key and the password/Secret key to be entered. When tested, a POST request should be issued to the above URL, by using the API Key (denoted by username in the connection manager, for generic usage) and Secret (password), concatenated, colon separated and base 64 encoded, sent as in the HTTP header.
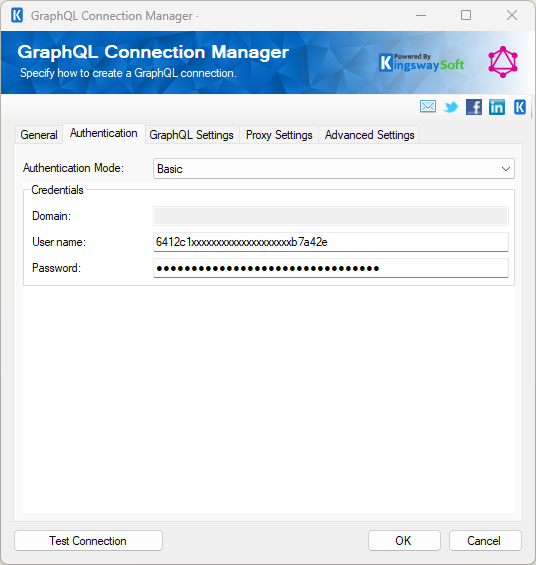
Once the authentication has been entered, we can click the Test Connection button to make sure that the connection is working correctly.
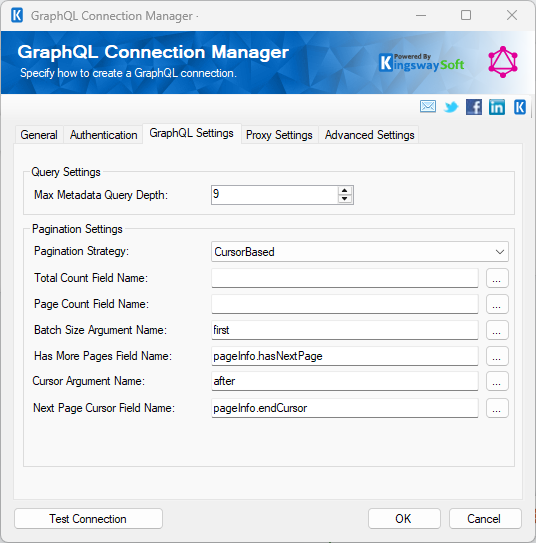
After we have made the authentication work, we need to move to the GraphQL Settings page to complete Shopify API specific configurations. One of the options here is the Max Metadata Query Depth option. This would be the number of nesting levels that the component parses to when processing the response. You would want to set this appropriately, and in our case, let's set it as 9. Next, we should set the API's Pagination Settings. GraphQL API supports two pagination strategies: CursorBased and OffsetBased. It happens that Shopify uses CursorBased pagination, so we make sure that it has been correctly selected. The screenshot below shows all the required parameters for the pagination to work properly. The ellipsis button next to each of the pagination parameter can help you choose a query and get the field. This is used to primarily detect the fields defined in the metadata so that you can choose one to be used as the pagination strategy fields. Note that since the component can be used to work with all such GraphQL APIs, the ellipsis button to pick the fields would help in identifying the detected metadata, and can be selected for the respective pagination.
The Shopify GraphQL API has PageInfo object returned on each page after data is retrieved, and this will contain the pagination information. The response can be something similar to the following screenshot.

And the table below can be referred to understand more about the PageInfo object (Shopify documentation link here).
| Field | Type | Description |
|---|---|---|
hasPreviousPage |
Boolean | Whether there are results in the connection before the current page. |
hasNextPage |
Boolean | Whether there are results in the connection after the current page. |
startCursor |
string | The cursor of the first node in the nodes list. |
endCursor |
string | The cursor of the last node in the nodes list. |
And the below parameters are used in the request for forward pagination.
| Field | Type | Description |
|---|---|---|
first |
integer | The requested number of nodes for each page. |
after |
string | The cursor to retrieve nodes after in the connection. Typically, you should pass the endCursor of the previous page as after. |
We will be seeing these in a working example in our upcoming sections.
Configuring GraphQL Source Component to Read Data from Shopify
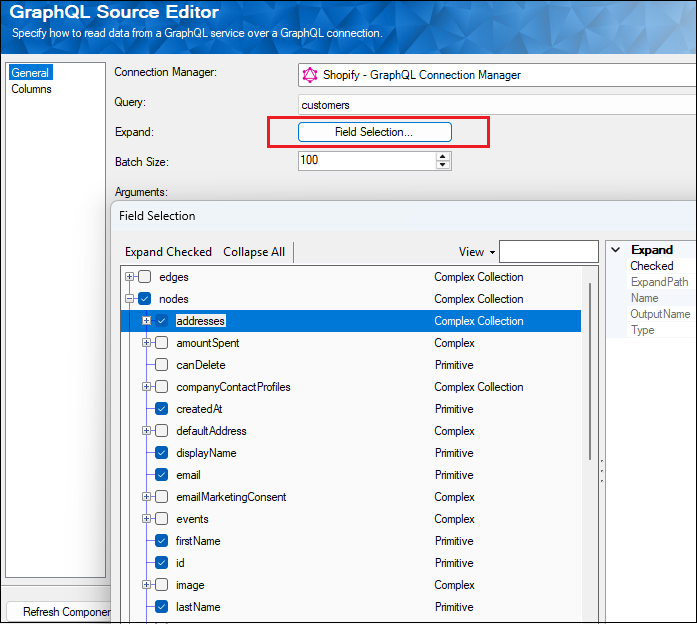
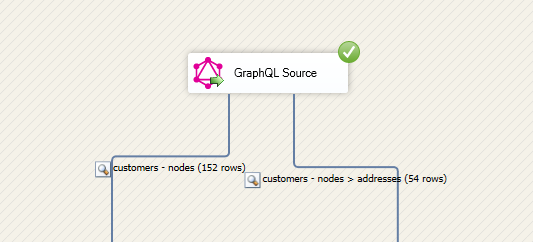
Once we have the connection manager tested and saved, let's drag and drop a GraphQL Source component to the SSIS data flow canvas to start the configuration. In the source component, we would choose the connection manager that was just created. As we have discussed, our GraphQL components are fully metadata-driven, you should be able to find the list of objects available using the Query option. Next, we can move on to click on the Field Selection button to open a new window where we can expand the nodes available in the treeview and then choose all the necessary fields that we wish to read from. We are choosing nodes and a few of its associated fields including addresses, which is its child.
Once the fields are selected, this would be reflected in the Arguments option in the General page, as well as the outputs and metadata in the Columns page.
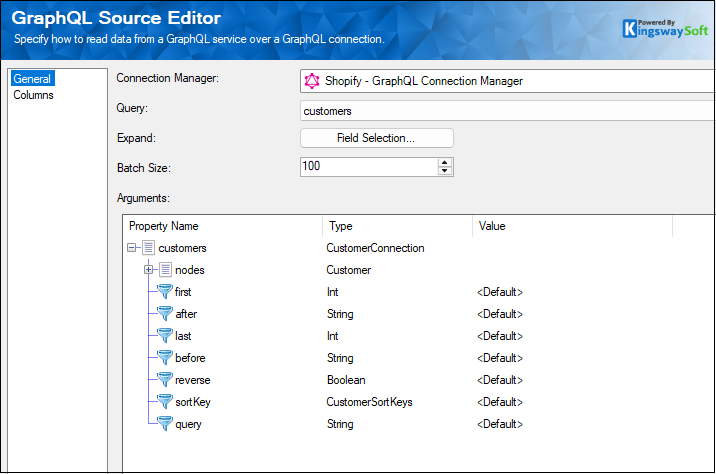
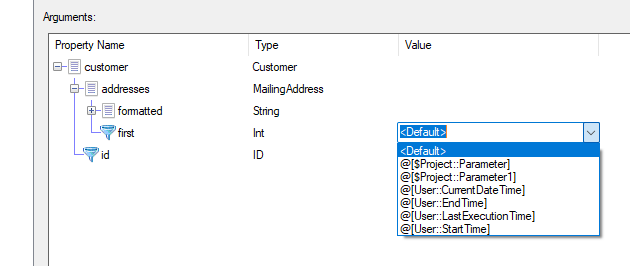
In the Arguments section, we have left everything as default, but you can also set values for a specific argument to make it dynamic.
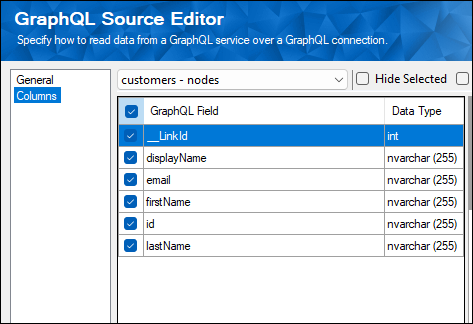
As you can see in the Columns page below, the Customers-Nodes is the parent output, and this has the _LinkId column available along with the fields we had selected.
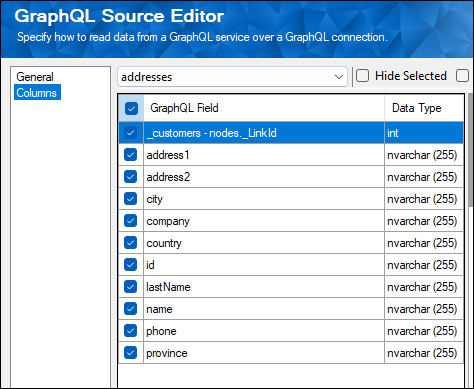
And addresses is a child output, which is available from the drop-down. The output comes with its own set of output columns along with their metadata, including a child-to-parent link field which is _customers - nodes._LinkId as shown below. This field points to the Parent _LinkId field. Such LinkId fields can used to establish associations between parent and child records in downstream pipeline components when needed. If you are interested in further details on how such associations work, please visit the blog post that was written previously by our team.
The batch size depends on the "Batch Size Argument Name" that we had provided in the connection manager, and it would be the node "first" in the service call. Note that you could choose batch mechanisms based on the endpoints you are working with. Once it's properly set up and configured, save and close the component, and you can run the data flow to receive the data from the Shopify GraphQL API.
As you can see from the following screenshot, the service call results in two requests being sent returning all satisfied records. In our case, the batch size was set as 100, and we have a total of 152 records.

The response from the first request has the next page info, which is used for pagination in the second request, as shown below. The second page (or last page) response, would yield a boolean false for the hasNextPage node, and the run ends.

Conclusion
With the growing popularity of GraphQL, you can see from our blog post that setting up a GraphQL flow to connect/read/write to the endpoints and APIs using KingswaySoft should be easy and straightforward. With our simple design and UI based configurations, setting up the connection and components can be achieved in a quick and efficient manner, which can drastically boost your development productivity.
We hope this has helped!