When working with NetSuite, integrations have traditionally relied on its SOAP-based web service interfaces. While functional, SOAP can be verbose, complex, and more rigid in terms of service interoperability, and it is especially challenging when handling authentication and working with custom objects. NetSuite’s newer REST API, by contrast, offers a modern, lightweight, and more flexibility in how objects are handled and processed, which makes it more secure and more efficient. In SSIS (SQL Server Integration Services) practice, many of our clients have used our NetSuite toolkit with great success using the SOAP connection that has been available since the initial release of the toolkit. The great news is, that we have recently introduced support for REST connections that work with OAuth authentication in the toolkit which provides the following benefits that make it more future-proof.
- OAuth is a modern application authentication and authorization infrastructure that provides a secure way to access your application data, it allows for scope-constrained access, and its token lifecycle management makes it more secure, as a token can only a limited lifecycle, and it can be revoked at any time if necessary.
- REST uses a simpler request/response structure, and offers better performance which makes it a preferred choice over SOAP, especially in modern ETL workflows that might deal with a large number of records.
In this blog post, we’ll walk through a working example of how to set up and integrate with NetSuite REST using OAuth token-based authentication leveraging the newly introduced features in an ETL process. We hope that this blog post can serve as a quick guideline on how to establish a successful connection to your NetSuite instance, allowing you to start your integration development.
Before we start, here is a brief summary of the steps that are required in order to achieve the connection with your NetSuite instance.
- Enable the REST Web Services feature in NetSuite.
- Create an integration record in NetSuite, generate consumer key and secret.
- Create a role in NetSuite and set permissions.pla
- Assign the role to a user.
- Generate the access token in NetSuite.
- Acquire the Account ID.
- Lastly, configure a NetSuite Connection Manager in SSIS.
In Your NetSuite Instance
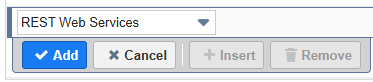
Step 1: First, we will need to enable the REST Web Services features to be able to work with Token-Based authentication. To do so, we would log in to NetSuite as an admin, navigate to Setup > Company, and find the Enable Features option in the menu.
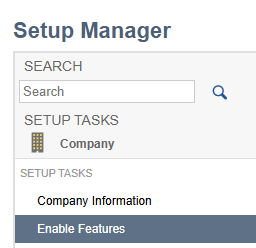
There will be an option to work with NetSuite REST-based Web Services, we should turn on this option by having it checked in order for the REST-based connection to work. Once done, we can save the setting (found near the bottom).

Step 2: The second step would be to create your Integration Record Setup. The section can be found under the Setup Manager: Setup > Integration > Manage Integrations and select the New option to create a new integration record.
An important note about the Consumer Key and Secret, they are only visible. They would be no longer available as soon as you have left the page. It is time to save both the Key and Secret which will be later used in the connection manager.
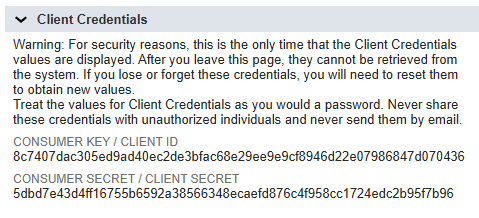
For required fields on this page you will need to ;name your new integration and set its State to Enabled in the dropdown. Under the Token-based authentication, we need to enable the TOKEN-BASED AUTHENTICATION option.
If you are editing an existing integration and working with a previous form of authentication you may leave the below settings configuration as default, since it will not affect the token-based authentication (the same integration record can be used for more than one authentication type). The Consumer Key and Secret may be regenerated with a new set of values using the Reset Credentials option when needed.

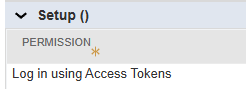
Step 3: The third step would be to create a new role or reuse an existing one. In our example we are creating a new role under the Setup Manager > Users/Roles > Manage Role and select New. The REST Web services feature does not use the same permissions as SOAP, in which case you would need record-specific permissions just like the UI roles. Permission to access records via REST lets you choose in a more fine-grain manner. This has the benefit of only needing to select the objects you intend to work with and provide just the required access level for each. When managing the role we would need to add Setup Permissions REST Web Services and Log in using Access Token and verify they are set to Full.
Note: Accounts object permission would need to be set as our connection manager calls this endpoint when you test the connection.
Step 4: Next we will be assigning the role to a user. To do so, we can go to Lists > Employees > Employees, edit the user, and add the role to their access tab.
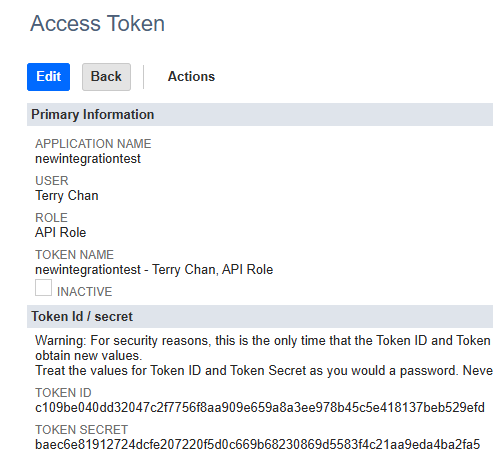
Step 5: Within the NetSuite environment we will be generating the Token ID and Token Secret. This can be found under the Setup Manager > Users/Roles > Access Tokens and selecting New. To generate the new token we will need to provide the information below and then click to save. It is important to note, a new token will only be visible until we leave the page. If you have ever lost the token, you will have to create a new one if the ID or Secret are lost as they cannot be regenerated.
- Application Name: Select the Integration Records created previously.
- User: Select the user assigned to the role.
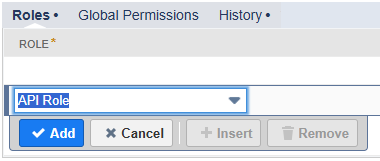
- Role: We select the 'API Role' role we created previously.
- Token Name: Give any name to keep track of the token.
Step 6: Lastly we can acquire the Account ID which will be the first portion in the browser URL when logged into your NetSuite environment.

Configure the Connection Manager in SSIS
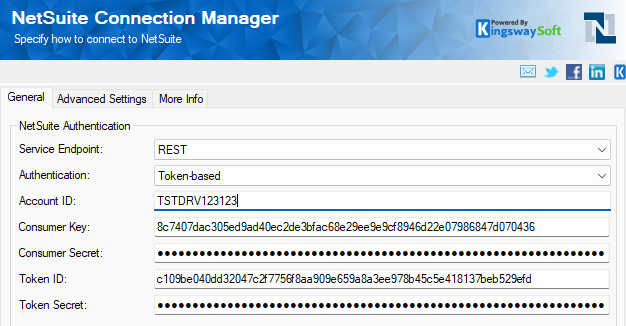
Step 7: Once you have completed the setup in NetSuite we can perform the last step by heading to your Integrations Services Project to complete the connection setup. We can create a new NetSuite Connection Manager, as shown below, you can use the information gathered earlier to fill out the connection properties for the REST Endpoint connection. The Consumer Key and Consumer Secret we have saved from step 2, and the Token ID and Token Secret saved from step 5. The Account ID can be copied over from step 6. Once you have the details we will be able to test the connection to ensure it is successful.
After the connection manager has been created, you can then add NetSuite Source and NetSuite Destination components in your data flow process to achieve data read and write purposes.
Closing Notes
We hope this guide has been helpful in getting you started with NetSuite REST integration. By following the steps above, you should now have a working connection using REST and OAuth authentication within SSIS. We briefly covered why REST is more efficient and secure, and how its token-based model is a strong improvement over the legacy SOAP approach.