Using the NetSuite Connection Manager
The NetSuite Connection Manager is an SSIS connection manager component that can be used to establish connections with NetSuite.
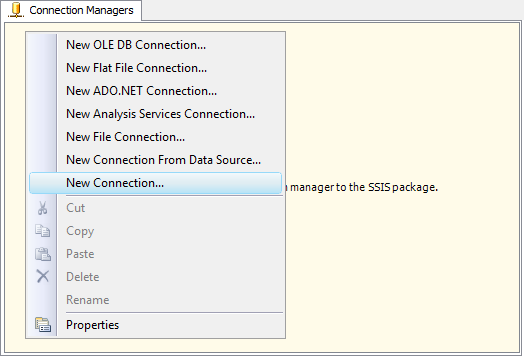
To add a new connection, right-click the Connection Manager area in your Visual Studio project, and choose "New Connection..." from the context menu.

You will be prompted the "Add SSIS Connection Manager" window. Select the "NetSuite (KingswaySoft)" item to add a new NetSuite Connection Manager.

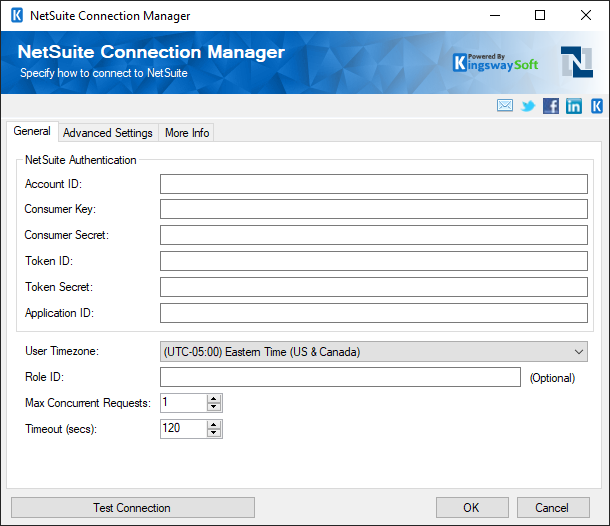
The NetSuite Connection Manager contains the following 3 pages of configuration:
- General
- Advanced Settings
- More Info
General Page
The General page allows you to specify connection properties and login credentials to NetSuite.

- NetSuite Authentication
-
- Service Endpoint (Since V25.1)
-
- The Service Endpoint option allows you to specify the API you want to connect to NetSuite with. There are two options available:
-
- SOAP
- REST
- SOAP
-
Use NetSuite token-based authentication to generate a token to access NetSuite SOAP.
-
- Account ID
-
The ID associated with your account. To find your account ID follow these instructions:
- Login to the NetSuite portal located here: www.netsuite.com/portal/home.shtml
- Navigate to Setup -> Integration -> Web Services preferences
- Locate the field called ACCOUNT ID
- Consumer Key
-
The Consumer Key value of the Token-Based Authentication application in NetSuite.
- Consumer Secret
-
The consumer secret value of the Token-Based Authentication app in NetSuite.
- Token ID
-
The Token ID value of the Access Token of the Token-Based Authentication application and the token permission role.
- Token Secret
-
The Token Secret value of the Access Token of the Token-Based Authentication application and the token permission role.
-
- REST (Since v25.1)
-
- Authentication
- Token-Based
-
- Account ID (REST)
-
You can find your NetSuite account ID at the beginning of the NetSuite URL. For example, if the URL is https://1234567.app.netsuite.com/, your account ID is 1234567.
- Consumer Key
-
The Consumer Key value of the Token-Based Authentication application in NetSuite.
- Consumer Secret
-
The consumer secret value of the Token-Based Authentication app in NetSuite.
- Token ID
-
The Token ID value of the Access Token of the Token-Based Authentication application and the token permission role.
- Token Secret
-
The Token Secret value of the Access Token of the Token-Based Authentication application and the token permission role.
-
- JWT
-
- Account ID (JWT)
-
The ID associated with your account. To find your account ID follow these instructions:
- Login to the NetSuite portal located here: www.netsuite.com/portal/home.shtml
- Navigate to Setup -> Integration -> Web Services preferences
- Locate the field called ACCOUNT ID
- Client ID
-
The Client ID for the JWT Authentication
- Algorithm
-
The algorithm used for signing of the token.
- Certificate ID
-
The Certificate ID for the JWT Authentication
- Private Key File
-
The path to the private key file to use for key-pair authentication.
- JWT
- User Timezone
-
The timezone that is specified in the preferences of the user account. It is important that this property is set correctly so that date values read from the server can be interpreted correctly.
- Max Concurrent Requests
-
NetSuite accounts typically have a limit on the number of concurrent requests and it will return an error if too many concurrent requests are sent. The component can limit the number of concurrent requests that will be sent to prevent errors.
- Timeout (secs)
-
The timeout property will determine when long-running server requests are considered to have timed out. After a request has timed out an error will be raised.
- Test Connection
-
After all the connection information has been provided, you may click the "Test Connection" button to test if the user credentials entered can authenticate with NetSuite.
Advanced Settings Page
The Advanced Settings page allows you to configure your NetSuite connection to Retry on Intermittent Error and to use a proxy server.

- Optional Settings
-
- Base URL
-
The web service base URL that NetSuite Connection Manager uses.
- Server URL
-
The Server URL field lets you specify the URL of the NetSuite instance that you will connect to.
- Retry On Intermittent Errors
-
This is an option designed to help recover from possible intermittent outages or disruption of service. It prevents the integration process from stopping due to temporary issues. Enabling this option will allow service calls to be retried upon certain types of failure. A service call may be retried up to 3 times before an exception is fired. Retries occur after 0 seconds, 15 seconds, and 60 seconds.
Warning: We have designed our retry feature carefully such that the retry should only occur when it is deemed safe to do so; however, in some occasions, such retry service calls could result in the creation of duplicate data.
- Proxy Server Settings
-
- Proxy Mode
-
The Proxy Mode option allows you to specify how you want to configure the proxy server setting. There are three options available.
- No Proxy
- Auto-detect (Using system-configured proxy)
- Manual
- Proxy Server
-
Using the Proxy Server option allows you to specify the name of the proxy server for the connection.
- Port
-
The Port option allows you to specify the port number of the proxy server for the connection.
- Username (Proxy Server Authentication)
-
The Username option (under Proxy Server Authentication) allows you to specify the proxy user account.
- Password (Proxy Server Authentication)
-
The Password option (under Proxy Server Authentication) allows you to specify the proxy user's password.
Note: The Proxy Password is not included in the connection manager's ConnectionString property by default. This is by design for security reasons. However, you can include it in your ConnectionString if you want to parameterize your connection manager. The format would be ProxyPassword=myProxyPassword; (make sure you have a semicolon as the last character). It can be anywhere in the ConnectionString.
More Info Page
The More Info page shows some basic information about the toolkit. On this page, you can find the version information of the toolkit.


