If you ever need to move emails across your Dataverse or Dynamics 365 CE/CRM/Dataverse environments, it is almost guaranteed that you will have to work with those email attachment records as well. This can present some unique challenges, as the Dataverse/CRM email attachment entity has some unique behaviors that require special attention to have the data migration or integration done correctly. In this blog post, we will show you how to properly work with the ActivityMimeAttachment entity in Microsoft Dynamics CRM and what you would need to look for when integrating CRM email attachments from one Dataverse/CRM environment into another.
For this use case, we will be using the components below, found in our SSIS Productivity Pack and SSIS Integration Toolkit for Microsoft Dynamics 365. Also, please note that in the sections below, we use the terminology "CRM", which represents CRM/CDS/CE/Dataverse instances, whichever applies in your case.
- Data Spawner This will be used to generate sample input data.
- CDS/CRM Destination component: This will be used to write our data into our Dataverse/Dynamics CRM environment. The Destination component will also require a Dynamics CRM connection manager to establish a connection to our target CRM system.
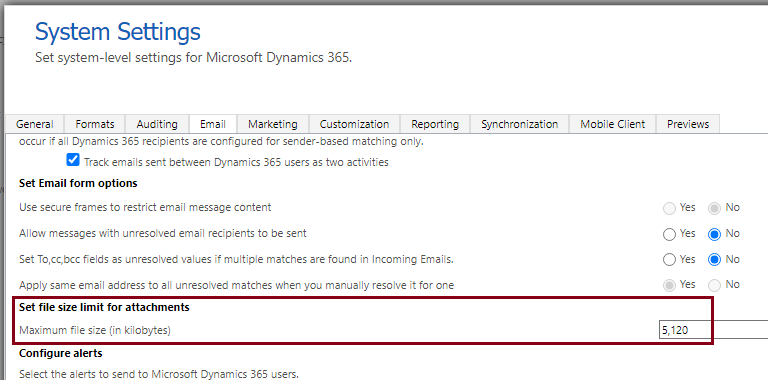
Before we begin designing the data flow, it would be prudent to check our Dynamics 365 interface to make sure that we have a proper file size setting when working with email attachment records. Essentially, we want to make sure that both the file sizes of our attachment files fall within the maximum file size value, and that the file types of your attachments are not blocked by your application. To check, we will first sign into Dynamics 365, select Advanced Settings, and then select Settings, Administration, and System Settings. The size limit setting may be adjusted under the Email tab and by default, this will be set to 5120 kilobytes.

Once all of the above is checked and confirmed, we will move into our SSIS design.
Design and Configuration
To begin, our data flow contains a Data Spawner Component that would simulate a Source in this example. This way, we may generate sample fields and their associated values to map in the destination component. Please note that in your use case, you would be replacing this with a source system to read the attachment data required. Below are some fields we have generated containing the required data, which should originate from the source system and will be mapped to the destination.

The image below displays a general data flow design featuring the Source and the Destination, which we will discuss in the following sections. Note that, we have not used any transformations like the Derived Column, etc., for any changes in our example; however, you could use it to have any transformations done for existing columns or to add new fields.

Note that the KingswaySoft CRM Destination Component accepts image datatypes/Binary columns to be mapped directly to the "body" field in the CRM activitymimeattachment entity. At a glance, this may seem like a mismatch between the datatypes (NTEXT and IMAGE), but behind the scenes, the file content is saved in the Dynamics database in base64 format. Our software would automatically encode the file content before sending the request to the server. If preferred, you can always encode the file content yourself using the EncodeBase64() function in our Premium Derived Column component which offers nearly 300 functions. With that being said, in the upcoming section, you can see that we map the FileContent column directly to the body field without any transformation.
Writing using the CRM Destination component
We will be utilizing our Dynamics CRM Destination Component to write the attachment file of an email to our destination. When working with attachments, you may want to consider selecting a lower batch size. This is because attachments can be quite large and require more time to process. With a larger batch size, if we write to the destination, it may not be completed within the allotted time, leading to potential timeout issues. The solution would be to reduce the batch size and/or increase the Service Timeout Setting in the CRM Connection Manager (by default, this is set to 120 seconds in the connection manager).

On the Columns page below, we have displayed the columns we are mapping and provided a brief overview.
 en
en
- ObjectId: The unique identifier (GUID) of the parent object with which the attachment will be associated. Specifically, this would be the GUID of the email activity.
- ObjectTypeCode: The type code of the entity with which the attachment will be associated. In our example, we will be using the string representation 'email,' and please note that this is case-sensitive.
- Body: The file content we have in the Source.
- MimeType: The media type of our attachment. In our example, the attachment is a png file, so the mimetype we will use is ‘image/png’.
- FileName: name of the file, including the extension. An example would be “attachment1.png”.
Please note that we have left the ActivityId column unmapped, which is the unique identifier (GUID) of the activity with which the attachment will be associated. This is an important rule when working with the activitymimeattachment entity. You should only map activityid field, or otherwise the combination of objectid and objecttypecode fields. You should not map both. When doing so, you will run into errors.
After all is done, you may now execute the package or data flow which should write email attachment record(s) successfully and the file attachments should be properly associated with the related email activity records in the system.
Conclusion
Regardless of the source system you choose, integrating file attachments into your emails is a manageable process once the setup is complete, as demonstrated in the steps above. As mentioned earlier, this method also applies to emails with multiple attachments, which is a common scenario. Feel free to explore our SSIS Integration Toolkits and experiment with their capabilities.
We hope this has helped!

