A report in Power BI is a great way to get a quick and detailed snapshot of your data sources. Within Power BI, you can easily export these report types by setting up a process that would send an email with a link to the report. However, you may run into issues if you try to send it to users who don't have a license or the privileges to view the report. This also applies to situations where you send a report to an external party.
In this blog post, we will discuss how KingswaySoft components can be used to overcome this restriction. Essentially, you can export the report in a supported offline format (such as a .pdf file) and send it to any email address required within a single data flow. Another benefit is that you can dynamically set how frequently to send the report (if the underlying data is quite dynamic, it would be helpful to increase the frequency) and add or remove recipients who will be receiving this email.
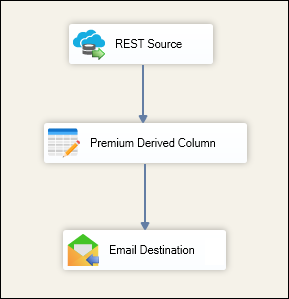
In our data flow, we will be working with the components below:
- REST Connection Manager & REST Source component: The connection manager will be used to establish a connection to the Power BI service, while the source component will be used to read from Power BI and get the report.
- Premium Derived Column component: We will be adding a few derived columns so we can dynamically provide values as needed.
- Email Connection Manager & Email Destination component: The connection manager will be used to establish a connection to the email service, and in the destination component, we can process the email, including the attachment (to send the recipients).
We have provided a reference of how the data flow may look.

Configuring the Source Component
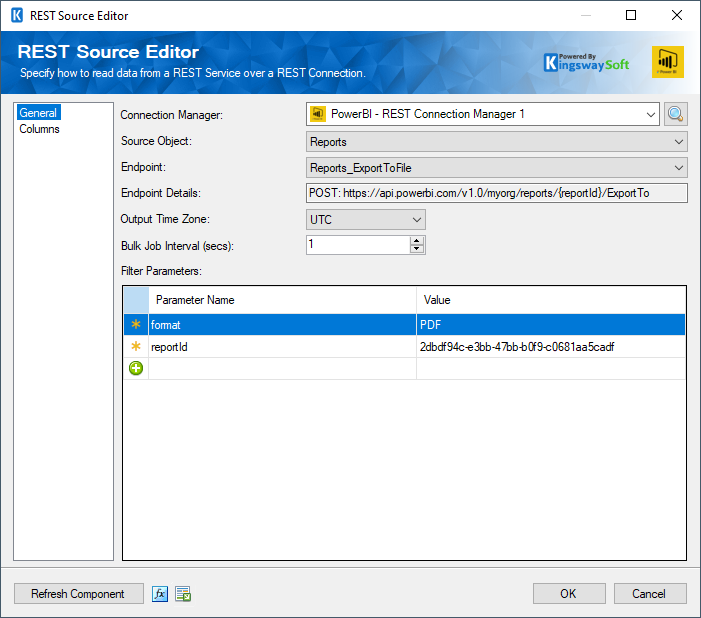
First of all, in our data flow, we will be using a REST source component, which uses a REST connection manager that connects to our Power BI instance. In the source component, after we have selected the Object and Endpoint we want to work with, there are two required parameters we need to set.

The first is the Format Parameter, which lets you select the export file type of your preference for the file. This is presented as a dropdown, which allows you to choose one of the available formats for the report export. For this blog post, we will choose PDF, which means the report will be exported and generated as a .pdf file.

For the second parameter, we need to get the report ID, which indicates the report we are trying to export. When you access your Power BI instance and navigate to a particular report, you can easily extract the report ID from the URL you have landed on. For instance, if your report URL is https://app.powerbi.com/groups/me/reports/1234494c-e3bb-47bb-b0f9-c0681aa5cadf/ReportSection?experience=power-bi, then your report ID is 1234494c-e3bb-47bb-b0f9-c0681aa5cadf.
Based on the above configuration, the source component will return a column that contains the report file's binary content. Later, we can map it directly into the Email Destination Component's Attachment Content Field for email sending.
To have some additional data to feed the destination component, we add a Premium Derived Column Component directly after the source component. In this component, we will populate a few columns to be used by the downstream pipeline component. As you can see from the screen below, we can use a combination of static values and SSIS variables to populate these new columns.

Configuring the Email Destination Component
Now, we come to the final component of the data flow, which will be an Email Destination Component with the Send Email action. On the Columns Page, we would be looking to map the fields below. To get the two fields, AttachmentContent and AttachmentName, we need to click the Add Attachment button at the top left. Note that the Email Destination Component supports more than one attachment. Then, we would click the same button again to add another pair of filename and file content columns.

At this point, the configuration is complete. After executing the package, we should receive a similar email to the one below. You can see that the report is attached to the email successfully as a .pdf file, which is convenient for easy reading and reviewing.
Conclusion
Once the process has been automated, it will export your report and send it as an attachment, with no other interaction required on your part. If any tweaks are required they will likely be minor, such as the frequency of sending the report or the recipients who will receive it, which can be easily adjusted. In this guide, we have shown how sending a report, including an external party that does not have access to your environment, is a breeze using SSIS and KingswaySoft components.
We hope this has helped!

