Using the Email Destination Component
The Email Destination Component is an SSIS data flow pipeline component that can be used to send emails in addition to performing basic tasks. There are three pages of configuration:
- General
- Columns
- Error Handling
The General page is used to specify general settings for the Email Destination Component. The Columns page is used to manage columns from the upstream component. The Error Handling page allows you to specify how errors should be handled when they occur.
General Page
The General page allows you to specify general settings for the component.

- Connection Manager
-
The Email Destination Component requires an Email connection. The Connection Manager drop-down will show a list of all Email connection managers that are available in your current SSIS package.
- Action
-
The Action specifies how you want to write to the Email specified in the selected Connection Manager. There are 11 Actions:
- Send Email: Sending email
- Send Raw Email: Send a raw email file
- Send Email By ID: Sending email using an ID
- Copy Message: Copy the message to the specific folder
- Move Message: Move the message to the specific folder
- Hard Delete Message: Delete the message permanently
- Soft Delete Message: Delete the messages
- Upload Message: Upload structured email content in field separated format.
- Upload Raw Message: Upload the email as a raw Mime-formatted message.
- Add Attachment: Add an Attachment to the email
- Delete Attachment: Delete an Attachment from the email
- Update Email: Change some specifications of the email
- Throttling Rate
-
The API Throttling Rate will limit the number of requests our component sends per interval based on the number of requests and the time interval set in the dropdown. This is helpful to respect the Email server's API Throttle limit and ensure your requests are not stopped.
Columns Page
The Columns page of the Email Destination Component allows you to map the columns from upstream components to the Email fields.

The Columns Page grid consists of:
- Input Column - Select an Input Column from an upstream component here.
- Email Field - The email field you are writing data to.
- Data Type - the value type for the current field.
- Unmap - Use to unlink a mapped column.
- Filter
-
The output columns that are visible can be filtered by entering text in the Find Column text box.
- Hide Unmapped Fields
-
When enabled unmapped output columns will be hidden.
- Hide Mapped Fields
-
When enabled mapped output columns will be hidden.
- Add Attachment
-
Click on the Add Attachment button to add two new columns where you may map the binary content of the attachment and attachment name.
- Delete Last Attachment
-
Remove the columns for the last existing attachment.
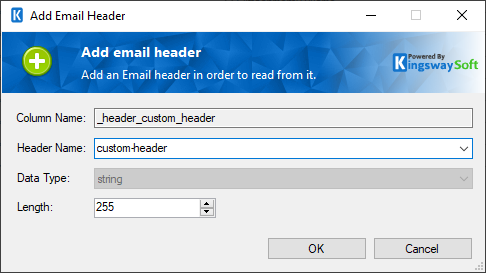
- Add Header
-
Clicking on the Add button opens the 'Add Email Header' dialog and allows columns to be added that will map to headers in the email. The Header Name, Data Type and Length can be provided
- Delete Header
-
The delete button will be enabled if a header column is selected. Clicking this button will delete a created header column.
The Columns page contains a grid that consists of four columns as shown below:
- Input Column: You can select an input column from an upstream component for the corresponding Email Field.
- Email Field: The field that you are writing data to.
- Data Type: This column indicates the type of value for the current field.
- Unmap: This column can be used to unmap the field from the upstream input column, or otherwise it can be used to map the field to an upstream input column by matching its name if the field is not currently mapped.
Error Handling Page
The Error Handling page allows you to specify how errors should be handled when they happen.

There are three options available.
- Fail on error
- Redirect rows to error output
- Ignore error
When the Redirect rows to the error output option is selected, rows that failed to be sent will be redirected to the 'Error Output' output of the Transformation Component. As indicated in the screenshot below, the green output connection represents rows that were successfully sent, and the red 'Error Output' connection represents rows that were erroneous. The 'ErrorMessage' output column found in the 'Error Output' may contain the error message that was reported by the server or the component itself.
