Your database system is a vital network resource that your business depends on to ensure overall business success. With the wide adoption of cloud computing, your database system living in the cloud can be a vulnerable target to security attacks. Therefore, protecting your database access is a crucial task for you as a database professional. One way to enhance access control in SQL Server is by working with OAuth authentication, which allows secure, token-based access without the full user credentials. Your modern compliance standards may have changed, and the current method, such as username/password with SQL Server authentication, falls short, or will in the near future. As businesses are looking to prioritize data security, traditional authentication methods in Azure SQL environments, like the popular SQL Server Authentication (which uses Username and Password), may not be secure enough in today's standard. With that being said, such security concerns or challenges can be fulfilled by working with the full suite of Premium SQL Server components, which we have recently made available in our v24.1 release. Our Premium SQL Server components provide support for modern OAuth2.0 authentication along with many advanced features.
To be more specific, while assisting clients who try to work with the out of the box ADO.NET Connection Manager to access their SQL Server online instances, we have run into multiple client cases where their connection manager tested successfully and the preview works as expected, but during runtime they received a error similar to the below which complains about "Could not created a managed connection manager". This is the error that can be solved once replaced with our SQL Server connection manager.
[ADO NET Source [2]] Error: ADO NET Source has failed to acquire the connection {AAD8A808-107E-4FF9-A71A-1CC36BBC0E3C} with the following error message: "Could not create a managed connection manager.".
In addition, we have also run into client cases where the clients were not able to establish connections properly when their Azure environments have MFA security policies implemented or enforced. To be more specific, the following is the error that they have received.
Failed to authenticate the user <user-identifier-here> in Active Directory (Authentication Active DirectoryPassword). Error code Oxinvalid_grant AADSTS50076: Due to a configuration change made by your administrator, or because you moved to a new location, you must use multi-factor authentication to access 00000007-0000-0000-c000-000000000000'. Trace ID: ### Correlation ID: ### Timestamp:2024-11-29 17:16:19Z
This problem can also be solved if leveraging our SQL Server connection manager couple with the Premium SQL Server components.
Configuring the Connection Manager
In our example, we will be working with OAuth - Authorization Code; however, any of the authentication methods used to establish a connection would be considered modern and secure. Our components work with the Microsoft.Data.SqlClient assembly, which supports the OAuth methods listed below. Internally, the assemblies are loaded on demand; this makes the process much easier as you would not need to install/manage these drivers on your own.
We support the following three OAuth modes:
- Client Credentials: Ideal for server-to-server access when there is no end-user involved. With this method, the client will be authenticating directly with Azure AD using the Client ID and Client Secret. This approach is simpler than the following two options, and there is no user involvement, which means customization would not be needed for user-level permissions.
- Client Credentials with Certificate: Similar to the Client Credentials Method, but uses a certificate to authenticate your application. No password would be involved. Instead, a certificate file would need to be installed on the machine, and the thumbprint retrieved for your application after upload. This process may involve managing/renewing the certificate. However, the process of selecting a Certificate from a store and filtering by User/Machine to select your certificate can be done fully within our component (File System would be selected using this method).
- Authorization Code: If you require a user to authenticate and obtain your permissions. This method would be suitable in cases where data needs to be accessed on behalf of a logged-in user.
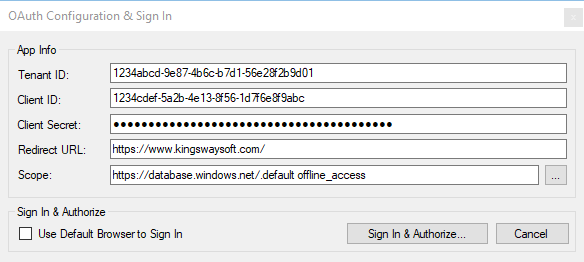
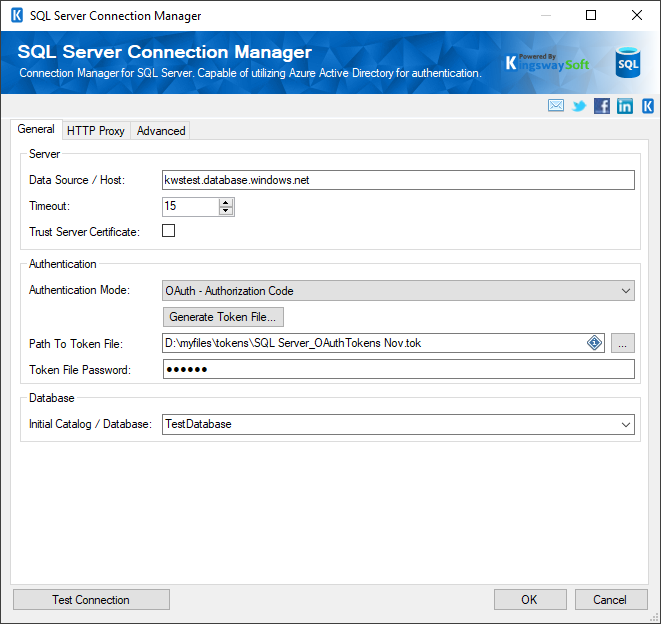
In today's case, we will provide a working example of OAuth's Authorization Code type. You may use the Generate Token button to configure your authentication and authorize your access token to your Azure SQL environment. The relevant details we need to acquire may be found within your App found in your Azure Portal.

- Tenant Id: Unique identifier for an Azure Active Directory instance, which determines the organization or domain to authenticate users against.
- Client Id: Unique identifier assigned to an application registered in Azure Active Directory, used to identify the app when authenticating.
- Client Secret: String associated with an application in Azure Active Directory, which you would generate from within Azure Portal to be used to authenticate the app in OAuth flows.
- Redirect URI: The URI to which users are redirected after authentication, you would need to configure or use a pre-defined URI set previously. Please note the URI must be accessible.
From the Scope property, you may open and select the available list to include, as well as be able to manually enter a scope into the field. We have included two scopes and they are separated by a space. - https://database.windows.net/.default: This scope is available by default and it is required to connect to your SQL Server.
- offline_access: This would be necessary if there is a token-refreshing mechanism required. In the case of the Authorization Code, we would want to include this scope.
Gathering Details from Azure Portal
We can retrieve the details from our App within Azure Portal. You may search for App Registrations and select your Application, under the Overview section, you may take note of the Client ID of your app, as well as the Tenant ID.

You may generate a Client Secret by going to the Certificates & Secrets Tab and selecting 'New client secret'. You would provide the description and expiry timeframe, and when added, take note of the new secret value under Client Secrets.

You may copy the Value for the secret you have created, as it will become obfuscated if you leave and open the Application page in Azure Portal (if a new secret value is needed, you may generate another).

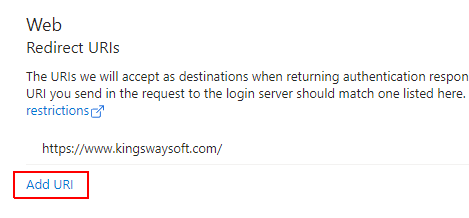
To set or see the available Redirect URIs from the App's Overview, click the Redirected URIs or go to the Authentication tab on the left side. You may copy an existing URI or select Add URI to add additional ones.

OAuth Configuration
Once you have the details above, we will be able to enter and then Sign in and Authorize. A physical token will be saved to the location chosen, and a password will be given to the token.

Note that the same token can be used in another connection. Only the path to the token and the associated password would be needed.

The Dropdown list for Catalog/Databases is made available after the authentication step so you may select a database from your instance. Lastly, at this step, the connection manager would be set up, and you would just need to Test Connection to confirm the connection is successful.
Conclusion
In this blog post, we hope to have clarified by showing how to work with our SQL Server Connection Manager and set up an OAuth connection to your Azure SQL server choosing any of the three methods we support. In a few steps, you can start to perform integrations to your Azure Cloud Database in a more modern and secure way. This will allow you to future-proof your Integrations as you move away from current legacy authentications.

