CDM Destination Component
The CDM Destination component is an SSIS data flow pipeline component that can be used to write data to Common Data Model (CDM) Data. The data from an upstream component is written to the Destination Object metadata with respect to the CDM manifest folder data file and the schema description files in it.
There are three pages to configure.
- General
- Columns
- Error Handling
General Page
The General page allows you to specify general settings for the component.

- Connection Manager
-
The CDM Destination Component requires a connection to write to a CDM folder. The
Connection Manager
drop-down will show a list of connection managers that are available. The supported connection managers are listed below:
- Local File
- SFTP Connection Manager
- FTPS Connection Manager
- Amazon S3 Connection Manager
- Azure Blob Connection Manager
- Azure Data Lake Storage Connection Manager
- Azure Files Connection Manager
- Box Connection Manager
- Dropbox Connection Manager
- Google Cloud Storage Connection Manager
- Google Drive Connection Manager (since v21.2)
- Hadoop Connection Manager
- OneDrive Connection Manager
- SharePoint Connection Manager (offered with the SSIS Integration Toolkit for Microsoft SharePoint)
- WebDAV Connection Manager
- Manifest Folder Path
-
TheManifest Folder Path specifies the location of the CDM folder that you are trying to write to. Based on the connection manager chosen, the ellipsis (…) button when clicked will open the storage path.
- Manifest Type
-
TheManifest Type can be chosen from the below two options
- Model
- Manifest
- Default Manifest
-
TheDefault Manifest would be chosen from the folder path based on the manifest Type specified in the previous field.
Note: Click on the lock icon to make this field editable, and then click on the ellipsis button to select another default manifest file to change the default one.
- Destination object
-
TheDestination object will be available to select based on the manifest type and the default manifest. These would be the entities described within the schema document.
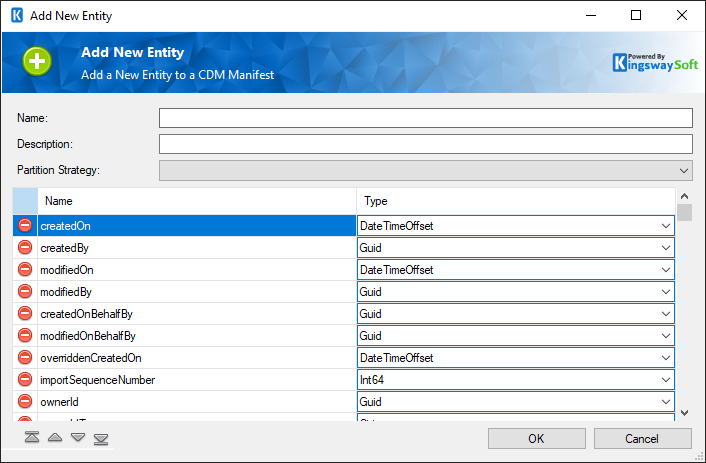
Note: Click on the “New” button to open up the below dialogue box to add a new entity to the CDM Manifest.
-

- Name: Name of the new entity
- Description: Description for the new entity
-
- Partition strategy: Choose the partition strategy from the following.
-
-
- None
-
- Year (YYYY)
-
- Year-Month (YYYY-MM)
-
- Name and Type Grid: Specify the metadata name and datatype.
-
- Partition Strategy
-
ThePartition Strategy can be chosen from the below options.
- Inherit: when choosing Inherit mode, the component will automatically create the new partition file based on the definedpartition strategy in the manifest file.
- None
- Partition
-
ThePartition for the data can be specified here. This would be to choose a specific partition or portion of data as specified in the schema description file.
Note: Click on “New” next to Partition to create a new Partition to the CDM entity. The below page with open up.
-

- Partitional Strategy: Choose the partition strategy.
-
-
- None
-
- Year (YYYY)
-
- Year-Month (YYYY-MM)
-
- Name: Name of the partition.
- Column Headers: Enable or disable column headers.
- Column Delimiter: Specify a column delimiter.
- Quote Style: Choose a quote style as either QuoteStyle.csv or QuoteStyle.none
- CSV Style: Choose the CSV style as eitherCsvStyle.QuoteAlwaysorCsvStyle.QuoteAfterDelimiter
- Encoding: Select the encoding from the options.
- Append To File
-
Enable this option to allow Append to file while writing.
- Refresh Component
-
Clicking the Refresh Component button causes the component to retrieve the latest metadata and update each field to its most recent metadata.
- Map Unmapped Fields Button
-
By clicking this button, the component will try to map any unmapped attributes by matching their names with the input columns from upstream components.
- Clear All Mappings Button
-
By clicking this button, the component will reset (clear) all your mappings in the destination component.
- Expression fx Icon
-
Click the blue fx icon to launch SSIS Expression Editor to enable dynamic updates of the property at run time.
- Generate Documentation Icon
-
Click the Generate Documentation icon to generate a Word document that describes the component's metadata including relevant mapping, and so on.
Columns Page
The Columns page of the CDM Destination Component allows you to map the columns from upstream components to the Destination object Fields.
On the Columns page, you would see a grid that contains four columns as shown below.

- Input Column: You can select an input column from an upstream component for the corresponding CDM Field.
- CDM Field: The field that you are writing data to.
- Data Type: This column indicates the type of value for the current field.
- Unmap: This column can be used to unmap the field from the upstream input column, or otherwise it can be used to map the field to an upstream input column by matching its name if the field is not currently mapped.
Error Handling Page
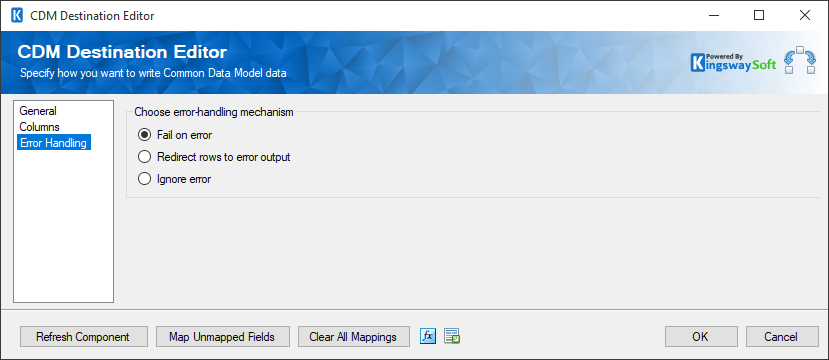
The Error Handling page allows you to specify how errors should be handled when they happen.

There are three options available:
- Fail on error
- Redirect rows to error output
- Ignore error
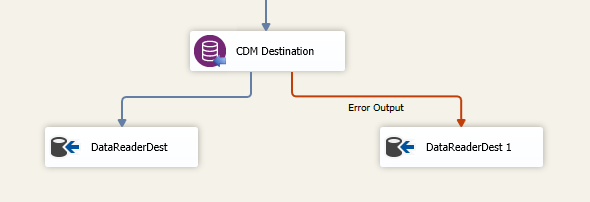
When the Redirect rows to error output option is selected, rows that failed to write to the CDM will be redirected to the 'Error Output' output of the Destination Component. As indicated in the screenshot below, the blue output connection represents rows that were successfully written, and the red 'Error Output' connection represents rows that were erroneous. The 'ErrorMessage' output column found in the 'Error Output' may contain the error message that was reported by the server or the component itself.


