Using the Amazon SQS Connection Manager
The Amazon SQS Connection Manager is an SSIS connection manager that can be used to establish connections with Amazon SQS. There are two pages to configure:
- General
- Advanced Settings
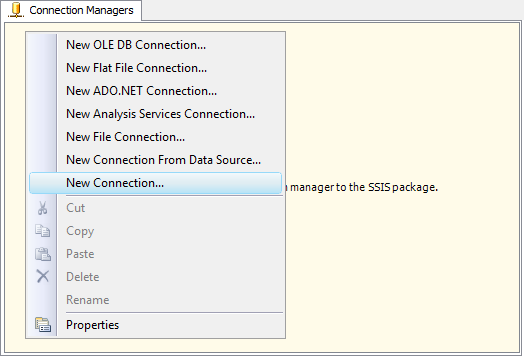
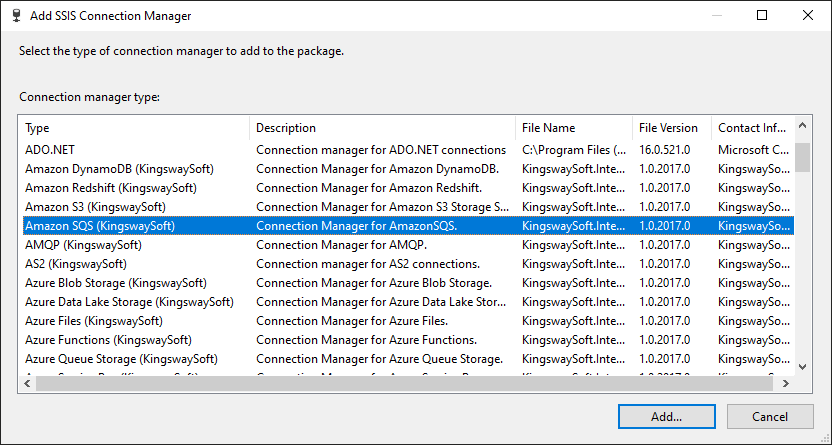
To add a new connection, right-click the Connection Manager area in your Visual Studio project, and choose "New Connection..." from the context menu. You will be prompted the "Add SSIS Connection Manager" window. Select the "Amazon SQS (KingswaySoft)" item to add a new Amazon SQS Connection Manager.


The Amazon SQS Connection Manager contains the following 3 pages of configuration.
- General
- Advanced Settings
General Page
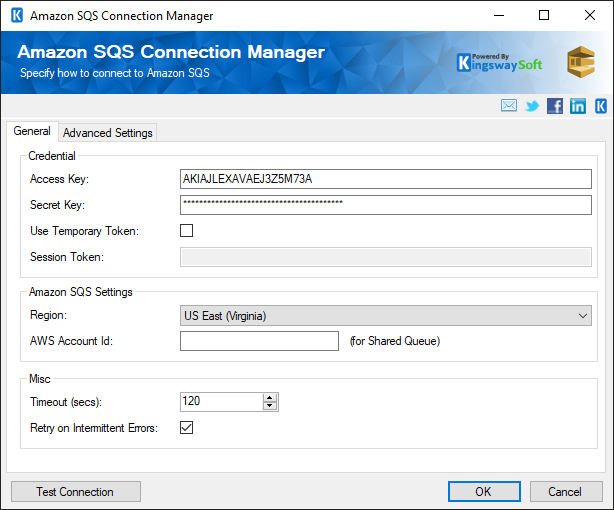
The General page allows you to specify connection properties and login credentials to Amazon SQS.

- Access Key
-
The Access Key option is used to specify the Access Key that you have requested from Amazon SQS. To find your Access Key follow these instructions:
- Sign in to the IAM console at https://console.aws.amazon.com/iam/.
- In the navigation pane, choose Users.
- Choose the name of the desired user, and then choose the Security Credentials tab. The user’s keys and the status of each key are displayed.
- Secret Key
-
The Secret Key option is used to specify the Secret Key that you have requested from Amazon SQS. Note that the secret key can only be retrieved when creating the key, which means if you forget the secret key you can only create a new access key in Amazon SQS. To create a user’s access key follow these instructions:
- Sign in to the IAM console at https://console.aws.amazon.com/iam/.
- In the navigation pane, choose Users.
- Choose the name of the desired user, and then choose the Security Credentials tab.
- Choose Create Access Key and then choose Download Credentials to save the access key ID and secret key to a CSV file on your computer.
- Use Temporary Token
-
Check the Use Temporary Token option to enable the Session Token option.
- Session Token
-
The Session Token option allows you to specify a temporary security token, known as temporary security credentials.
- Region
-
The Region drop-down list allows you to pick the endpoint based on your region.
- AWS Account Id
-
The AWS Account Id option allows you to specify an AWS Account Id to work with the shared queue.
- Timeout (secs)
-
The Connection Timeout option allows you to specify the number of seconds for the request timeout values. The default value is 120 seconds.
- Retry on Intermittent Errors
-
This is an option designed to help recover from possible intermittent outages or disruption of service. It prevents the integration process from stopping due to temporary issues. Enabling this option will allow service calls to be retried upon certain types of failure. A service call may be retried up to 3 times before an exception is fired. Retries occur after 0 seconds, 15 seconds, and 60 seconds.
-
Warning: We have designed our retry feature carefully such that the retry should only occur when it is deemed safe to do so; however, in some occasions, such retry service calls could result in the creation of duplicate data.
Advanced Settings Page
The Advanced Settings page of Amazon SQS Connection Manager allows you to specify how you want to configure the proxy server.

- Proxy Mode
-
The Proxy Mode option allows you to specify how you want to configure the proxy server setting. There are three options available:
- No Proxy
- Auto-detect (Using system-configured proxy)
- Manual
- Proxy Server
-
Using the Proxy Server option, you can provide a proxy server to connect to Amazon SQS.
- Port
-
The Port option allows you to specify the port number of the proxy server for the connection.
- Username
-
The Username option allows you to specify the proxy user account.
- Password
-
The Password option allows you to specify the proxy user’s password.
Note: Proxy Password is not included in the Amazon SQS connection manager’s ConnectionString property by default. This is done by design for security reasons. However, you can include it in your ConnectionString if you want to parameterize your connection manager. The format would be ProxyPassword=myProxyPassword; (make sure you have a semicolon as the last character). It can be anywhere in the ConnectionString.

