Using the Premium SQL Server Destination Component
The Premium SQL Server Destination Component utilizes the KingswaySoft SQL Server Connection Manager to facilitate writing to SQL Server databases. There are four pages that can be configured:
- General
- Columns
- Pre & Post Commands
- Error Handling
General Page
The General page of the Premium SQL Server Destination Component allows you to specify the general settings of the component.
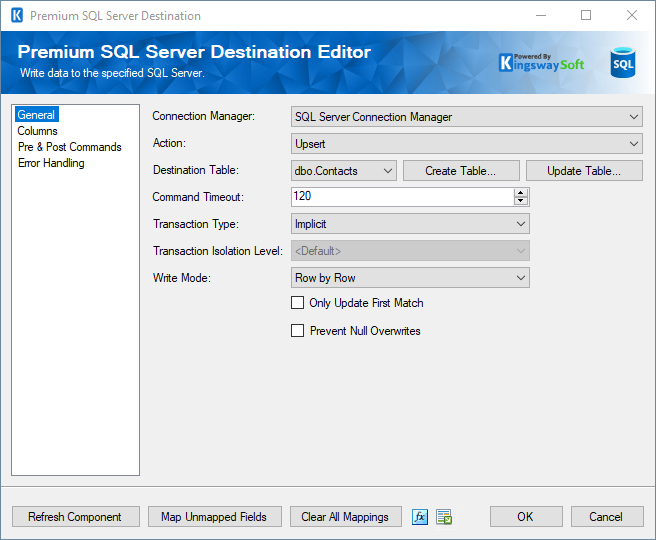
- Connection Manager
-
The Premium SQL Server Destination Component requires an SQL Server connection manager.
- Action
-
The command you want to execute on the Destination Table. Available actions include:
- Insert: Add records to the Destination Table.
- Update: Update existing records in the Destination Table
- Upsert: If the specified record exists in the Destination Table, it is updated, otherwise it is inserted.
- Delete: Delete existing records from the Destination Table.
- Full sync: Synchronize input data to the Destination Table. Full Sync action differs from Upsert action in the way that it can delete those records in the target system but not in the source system.
- Custom Command: Allows you to write your own database command. When Custom Command action is selected you will notice a command textbox and a tree view will appear. The tree view contains a list of Input Columns, SSIS Variables, and Database Tables from the selected Connection Manager. Selecting a table will expand it with its columns. You can drag and drop the items in the tree view to the command text box to help construct the command. During runtime, the command is executed for each record in the Input. Column and Variable values are properly parameterized and prepared for the database.
- Insert: Add records to the Destination Table.
- Destination Table
-
The Destination Table drop-down displays a list of available tables for the database specified in the Connection Manager.
- Create Table
-
This command will launch the SQL Server Table Creator, which you can use to create a database table based on the input columns from upstream components.
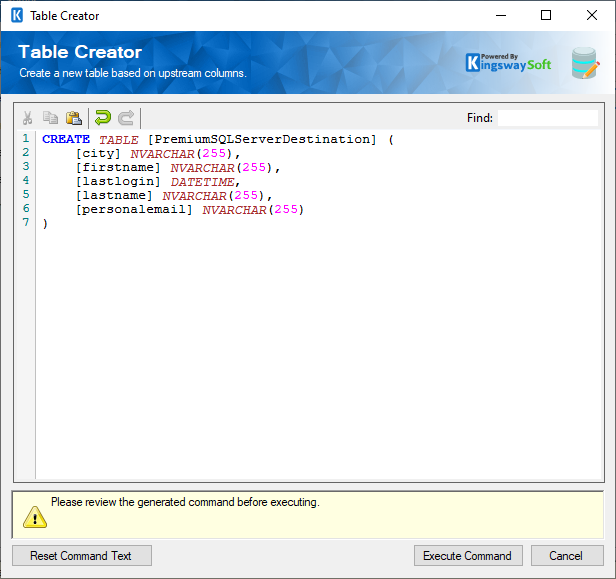
It auto-generates a command based on the selected Connection Manager and Input Columns to create a new table. You can further customize the command to suit your needs, and then click the 'Execute Command' button. You will be informed if the command was executed successfully or not, and the table you created will be selected in the Destination Table property.
- Update Table
-
This command will launch the SQL Server Table Updater, which you can use to Update or alter a database table based on the input columns from upstream components.
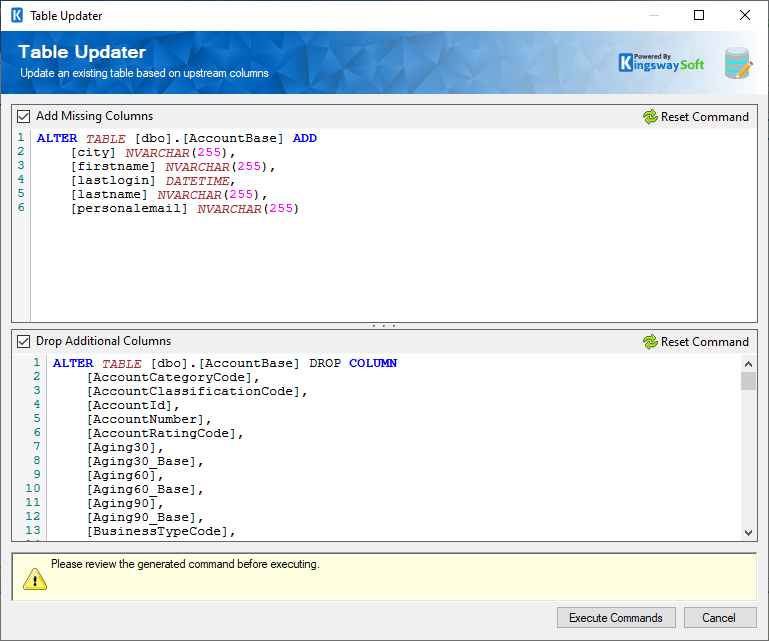
It auto-generates a command based on the selected Connection Manager and Input Columns to create a new table. You can further customize the command to suit your needs, and then click the 'Execute Command' button. There are different types of Alter commands that you can perform based on your requirements:
- Add Missing Columns
- Drop Additional Columns
- Add Missing Columns
- Command Timeout
-
The Command Timeout option allows you to specify the number of seconds for the command timeout values. The default value is 120 seconds.
- Transaction Type
-
This option allows you to specify the type of transactions by choosing Explicit and selecting an Isolation Level, or by choosing Implicit.
- Transaction Isolation Level (Available only when "Explicit" Transaction Type is selected)
-
The Transaction Isolation Level option allows you to specify concurrency behaviors for database tables. Different data providers support different isolation levels. There are a total of six options available when "Explicit" Transaction Type is selected:
- Chaos
- Read Committed
- Read Uncommitted
- Repeatable Read
- Serializable
- Snapshot
- Chaos
- Write Mode
-
The Write Mode option allows you to specify how the data is written into the database. There are a total of two options available depending on the database connection:
- Row by Row
- Batch
- Bulk (Recommended for the best performance)
- Upsert Mode (Only for Upsert action since v25.1)
-
The Upsert Mode option allows you to specify how the data is written while performing an Upsert action. There are a total of three options available:
- Full Upsert
- Insert Only - Existing records are ignored
- Update Only - New records are ignored
- Batch Size
-
The batch size can be set in this option when selecting the Batch or Bulk write mode. Specify zero (which is default) to use the SSIS buffer size.
- Refresh Component Button
-
Clicking the Refresh Component button causes the component to retrieve the latest metadata and update each field to its most recent metadata.
- Map Unmapped Fields Button
-
By clicking this button, the component will try to map any unmapped attributes by matching their names with the input columns from upstream components.
- Clear All Mappings Button
-
By clicking this button, the component will reset (clear) all your mappings in the destination component.
- Expression fx Icon
-
Click the blue fx icon to launch the SSIS Expression Editor to enable dynamic updates of the property at run time.
- Generate Documentation Icon
-
Click the Generate Documentation icon to generate a Word document that describes the component's metadata, including relevant mapping and more.
Columns Page
The Columns page of the Premium SQL Server Destination Component allows you to map the columns from upstream components to fields of the specified Destination Table in the General Page. The Columns page is not available when the selected action is Custom Command.

- Input Column: Select an Input Column from an upstream component here.
- Destination Table Column: This is the field you are writing data to.
- Lookup: Enable the lookup feature by mapping the virtual '<Lookup>' input column to the destination table column. When this option is selected, the component can perform a lookup based on input values. For further information about how to use the Lookup feature, please refer to the Working with the Lookup Feature section below.
- Data Type: This column indicates the value type for the current field.
- Unmap: This column can be used to unmap the field from the upstream input column, or otherwise it can be used to map the field to an upstream input column by matching its name if the field is not currently mapped.
Output Parameters Page
The Output Parameters page of the Premium SQL Server Destination Component comes up when Custom Command action is chosen in the General Page.
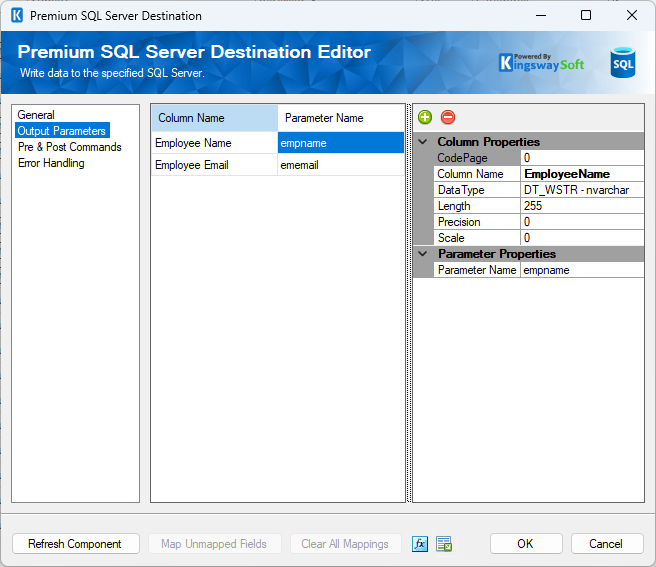
- Column Name: This would be the column name that needs to show up in the SSIS pipeline in downstream data flow metadata.
- Parameter name: This is the name of the output parameter that is defined in your command/procedure.
Pre & Post Commands Page
The Pre & Post Commands page allows you to specify commands to execute before and after component execution.
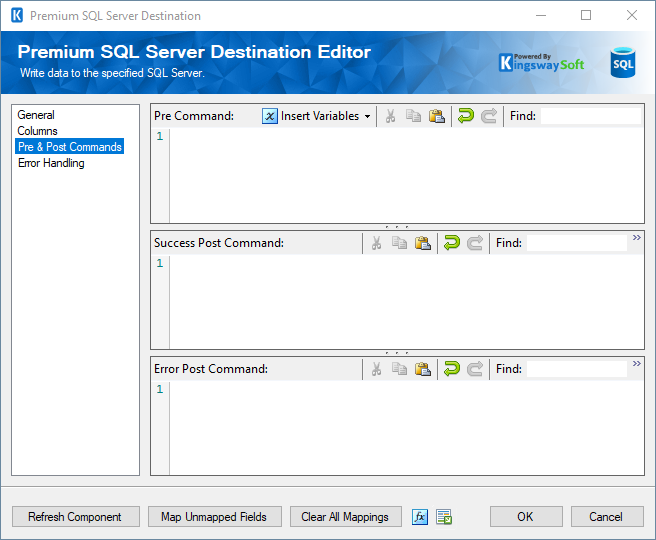
Pre and Post Command textboxes now support the use of User and System Variables. Simply select a variable under the Insert Variables drop-down menu, and a placeholder value will be inserted into the command text.
- Pre Command
-
The Pre Command will be executed in Pre-Execute. Leave blank to NOT execute any command.
- Success Post Command
-
The Success Post Command will be executed in post-execute when it is successful. Leave blank to NOT execute any command.
- Error Post Command
-
The Error Post Command will be executed in post-execute when there is an error. Leave blank to NOT execute any command.
Error Handling Page
The Error Handling page allows you to specify how errors should be handled when they happen.
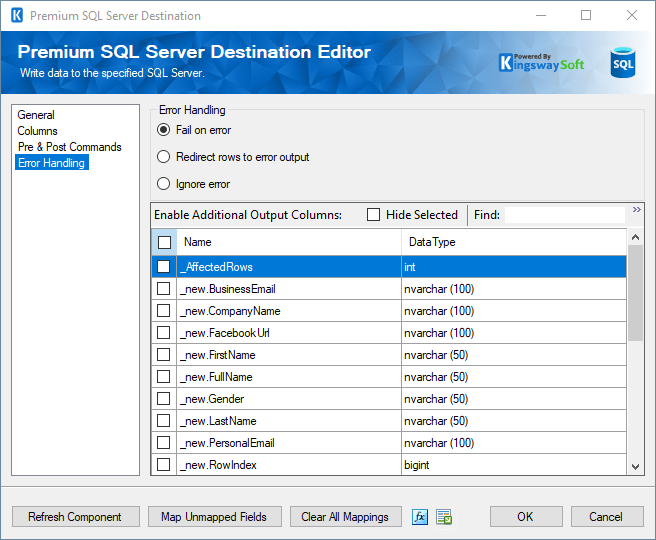
There are three options available:
- Fail on error
- Redirect rows to error output
- Ignore error
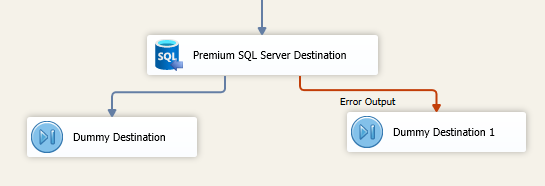
When the Redirect rows to error output option is selected, rows that failed to be sent will be redirected to the 'Error Output' output of the transformation component. As indicated in the screenshot below, the green output connection represents rows that were successfully sent, and the red 'Error Output' connection represents erroneous rows. The 'ErrorMessage' output column found in the 'Error Output' may contain the error message that was reported by the server or the component itself.
Note: Use extra caution when selecting the Ignore error option, since the component will remain silent for any errors that have occurred.
Note: When there is an error during the execution of the Post Command, the component will always fail by reporting an error, even though the Error Handling option may have been chosen otherwise.